Universal G-Code Sender, also known as UGS, is an application for sending commands to CNC machines or 3D printers. It has a simple interface that allows users to quickly and accurately control their machines. Below, we describe the key features of UGS and how you can get started easily.
Key Features of UGS
UGS offers a variety of features that can help streamline your workflow. These include:
- You can work without restrictions: Whether you need to cut metal, wood, plastic, or other materials, this software gives you complete control over your machine and allows for the precision editing of even the most complex code sequences. You can also edit your code directly inside the program or run multiple jobs at once, and it's possible to group different sections of your code to run simultaneously with just a few clicks.
- Grbl support: It includes full support for the popular Grbl control board, making it easy to use with many machines, including those using the popular Arduino platform.
- Smoothieboard support: UGS also includes full support for the Smoothieboard control board, making it easy to use with a wide range of machines, including those using the popular Smoothie firmware.
- Cross-platform support: It is available for Windows, Mac, and Linux, making it easy to use with just about any computer.
- Free and open-source: It is free and open-source software. You can use it without worrying about licensing or price.
How to Get Started With Universal G-Code Sender
To get started, download Universal G-Code Sender from GitHub and install it on your computer. The program can be easily downloaded and set up in just a few minutes. Once you install it, you need to connect your CNC machine (or 3D printer) to allow you to send commands from the user interface of Universal G-Code Sender directly. To do this, you can select your firmware, specify the port, and then connect.

Importing and Working With G-Code in UGS
To import your G-code file to Universal G-Code Sender, go to the File menu and select Open. You will see an option to open All Files, UGS Design (ugsd), or G-Code (gcode, nc, txt). Choose G-Code, go to where you have stored it on your computer, and import it into the software.

Once you import the file, there is an option to type your commands and even modify your G-code easily. To do this, you can write your code in the Command section and then run it, and you will be able to see your file modified. The command option is demonstrated below.

The Visualizer in Universal G-Code Sender
Like many 3D printing software applications, the Universal G-Code Sender software includes a visualizer tool that allows users to view their 3D models in real time. It makes it easy to see how each model layer will look allowing users to make any necessary adjustments before sending their designs to your machine.
The figure below shows a set of chess pieces with their G-code commands before being sent for laser engraving.

Additionally, the visualizer tool provides a convenient way for new users to familiarize themselves with the software and get comfortable with essential editing functions before moving on to more complex design work.
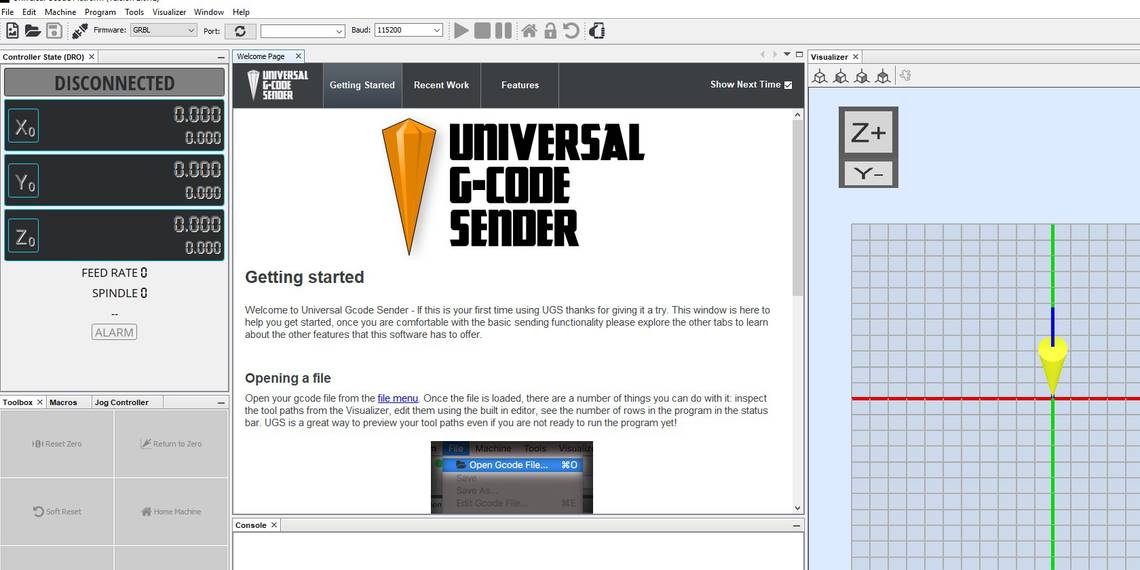
Understanding the Controller State in UGS
Once you import the G-code commands to UGS and modify them based on your needs, the software will store them in the controller state or the part of memory where each machine's movement is stored until the execution starts.
When you connect your machine to UGS, you see the movement through the controller state in the X, Y, and Z settings. And just below it, you will see FEED RATE and SPINDLE settings too, as shown below.

The X, Y, and Z values will tell you the current position of your CNC machine, and you can control them accordingly.
Plugins in UGS
Plugins are an integral part of the Universal G-Code Sender software, providing users with an endless array of possible functions and customizations. Each plugin provides a specific set of capabilities, from optimizing workflow to editing and generating the G-codes.
The first plugin that you will see is the Gcode Tiler. It allows you to make multiple copies of your G-code program. As shown below, you can specify the number of copies you need and their spacing by adjusting the X Count, Y Count, and Padding between them.

Once you complete the setting, click Generate gcode, and you will be able to get the new code.
Another plugin included in the software is the Workflow Helper, which makes it easier to add and remove files and see the actions you have made on files and completed them.

There is also the Dowel Maker, which allows you to make dowels and generate or export their G-codes. You can specify the number you want and other settings, as shown below.

In addition, there is a Jog Controller plugin and an auto-leveler plugin. The Jog Controller helps you control your machine's movement manually when necessary. At the same time, the auto leveler lets you automatically adjust the height and position of your build platform based on captured scans or measurements taken with precision tools.
Customizing Your Universal G-Code Sender Workspace
To customize your workspace, you can head to the Tools section and select Options. You will see several options, such as General settings for changing things like the proxy option. You can choose whether or not to use a proxy and what type. That is, whether proxy system settings or manual proxy.
There is also an option to test your machine's connectivity, which can be helpful if you're experiencing issues.

Next is the Editor section, where you can choose your language settings and customize things like font and background/foreground colors. The Keymap section allows you to modify shortcut keys based on your preferences.

The Appearance section lets you set things like what documents are opened by default, where to place the tabs on each window, and how the windows look overall. When you finish customizing the software, click Apply.
Essential Tips To Consider When Using UGS
If you're looking to use Universal G-Code Sender with your CNC machine or 3D printer, there are a few things to keep in mind. Here are some of them:
- Start simple: Don't be tempted by all the advanced options available with this software; instead, focus on basic operations like controlling your machine from the UGS interface and modifying your G-code.
- Use the correct port: Ensure you use your machine's correct port. UGS automatically detects and connects to the correct port, but double-checking is always good.
- Check your baud rate: Baud rate is the speed at which data moves between UGS and your machine. If you're having trouble connecting, it could be because of an incorrect baud rate. By default, the baud rate is 115200.
- Use the correct firmware: When you open UGS, you see that eight firmware options are supported. You can choose the right one for your specific machine. GRBL is the default, and it supports a variety of CNC machines.
Work With Your G-Codes Precisely With UGS
If you work with CNC machines, it is essential to use UGS to edit and customize your G-codes and ensure that every step of your CNC machining process is optimized and fine-tuned to achieve the desired results. As we have seen, with this tool at your disposal, you can optimize the entire CNC machining workflow from start to finish, ensuring high precision and efficiency at all times. Just be sure to choose the correct firmware and baud rate to ensure your project is successful.