Laser Engraving, Up Close

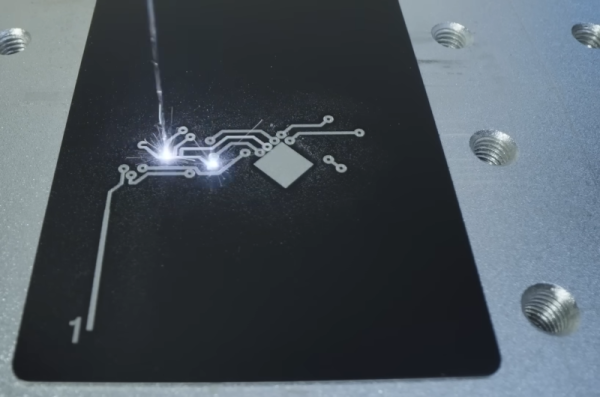
You know you aren’t supposed to watch your laser while it is cutting or engraving. But [Alex] hosted Wired in his studio and showed them how lasers engrave metal with a fiber laser. You can see the video below.

If you haven’t used a fiber laser, you might be surprised that while a 60 W model can burn metal, it does absolutely nothing to [Alex’s] hand. We wouldn’t try that, by the way, with the common diode lasers you see in most hacker’s labs these days. The video isn’t terribly technical, but it is interesting to see different metals succumb to the powerful laser. There are a few tips about marking different metals in different ways and how to deal with thermal expansion and other effects.

Fiber lasers aren’t as common as diode engravers in private shops, but we assume it is just a matter of time before they get cheaper. Not to mention their widespread use commercially means surplus units might become available, too.

If you are interested in lasers, [Alex’s] YouTube channel has quite a few interesting videos to check out. If you need more power, how’s 200 kW? Then again, even 20 W will get you something useful.

Continue reading “Laser Engraving, Up Close”

An LCD mounted inside a Roland synthesizer

Reverse-Engineering A Display Protocol To Repair A Roland Synthesizer

Repairing electronic devices isn’t as hard as it used to be. Thanks to the internet, it’s easy to find datasheets and application notes for any standard component inside your gadget, and once you’ve found the faulty one, you simply buy a replacement from one of a million web shops — assuming you don’t end up with a fake, of course. When it comes to non-standard components, however, things get more difficult, as [dpeddi] found out when a friend asked him for help in repairing a Roland Juno-G synthesizer with a broken display.

The main issue here was the fact that the display in question was a custom design, with no replacement or documentation available. The only thing [dpeddi] could figure out from the service manual was the basic pinout, which showed a parallel interface with two lines labelled “chip select” — an indication that the display contained two separate controllers. But the exact protocol and data format was not documented, so [dpeddi] brought out his logic analyzer to try and decode the signals generated by the synthesizer.

After a bit of trial and error, he was able to figure out the protocol: it looked like the display contained two KS0713-type LCD controllers, each controlling one half of the screen. Finding a compatible replacement was still proving difficult, so [dpeddi] decided instead to decode the original signals using a microcontroller and show the picture on a modern LCD driven by SPI. After some intial experiments with an ESP32, it turned out that the task of reading two reasonably fast parallel buses and driving an even faster serial one was a bit too much for the ESP, so [dpeddi] upgraded to a Raspberry Pi Pico. This worked a treat, and thanks to a 3D-printed mounting bracket, the new display also fit snugly inside the Roland’s case.

The Pico’s code is available on [dpeddi]’s GitHub page, so if you’ve also got a dodgy display in your Juno-G you can simply download it and use it to plug in a brand-new display. However, the method of reverse-engineering an existing display protocol and translating it to that of a new one is pretty universal and should come in handy when working with any type of electronic device: say, a vintage calculator or multimeter, or even another synthesizer.

A 3D Printed Ratchet That Can Really Take The Torque

Printed tools aren’t exactly known for their durability, but [Gladius] shows us that with some thoughtful design, it’s possible to print a ratcheting wrench that can handle surprising amounts of torque.

Look closely, and you can see that the parts are almost entirely made up of perimeters (click to enlarge).

This particular wrench is inspired by NASA’s 3D printed ratcheting wrench, and also from an early 1900s design. It sports a 1/2 inch square socket into which modern adapters can be fitted, allowing those steel parts to do their job while the wrench itself delivers the muscle.

[Gladius] found that the strongest results came from slicing parts — especially the handle — so that they come out consisting almost entirely of perimeters, with virtually no traditional infill. Want to know more? There’s a discussion on reddit where [Gladius] goes into added detail about measurements and performance.

Over the years, we’ve seen our share of powerful prints. For example, what the Crimson Axlef*cker can do looks downright intimidating. Speaking of printing things that move, we want to remind you about this handy tip for easily and reliably joining motor shafts to printed parts by (mis)using jaw couplings.

Organizational Inspiration From The Discount Tool Company

When in need of any tool to get a job done quickly, or only for a small number of times, it’s great to have a local “discount tool” company locally for some working, yet often low-quality solution to whatever problem might arise. While there are some gems, most of these tools won’t last through heavy, sustained use like their more expensive counterparts will. On the other hand, there are other things to be had at these discount shops, such as inspiration for tackling a storage problem.

This particular storage system comes from Harbor Freight, and uses a set linked crosshairs, the center of which is hollowed out. A set of movable compartments sits on top with feet that can interlock inside the crosshairs. This allows much more efficient use of space within the toolboxes, but [Alan] wanted it to be useful for more that that. He designed and implemented the Storage Case Base Template (SCBT) which allows for a container of any size to be fitted with a similar crosshair network.

With this non-proprietary system implemented and printed, the original goal of reducing the clutter in [Alan]’s workspace was accomplished. The 3D printing files can be modified easily for any space, and are available both on Thingiverse and Printables. For some other ways of packing a lot into a small space, we featured this tiny workshop a while back that’s packed with storage hacks.

A small keyboard form factor retrocomputer with blue keys on a black background sits in front of a display and a LEGO model of the Space Shuttle. There are a number of jumper wires and a breadboard coming from an open panel on the right side of the machine.

Aqua PCB Is A Big Upgrade For The Mattel Aquarius

In case you weren’t around in the 80s, or you happened to blink, you may have missed the Mattel Aquarius computer. [Nick Bild] has a soft spot in his heart for the machine though and built the Aqua cartridge to make the Aquarius into a more usable machine.

Originally equipped with a mere 4 KB of RAM and a small, rubbery keyboard, it’s not too surprising that the Aquarius only lasted five months on the market. [Nick] decided on the cartridge slot to beef up the specs of this little machine given the small number of expansion ports on the device. Adding 32 KB of RAM certainly gives it a boost, and he also designed an SD card interface called Aqua Write that connects to the Aqua cartridge for easily transferring files from a more modern machine.

The Aqua Write uses an Arduino Mega 2560 to handle moving data between the SD card and the system’s memory. This is complicated somewhat because a “PLA sits between the Z80 and data bus that XORs data with a software lock code (initialized to a random value on startup).” [Nick] gets around this by running a small program to overwrite the lock code to zero after startup.

Getting data on and off retrocomputers can certainly be a challenge. If you’re trying to get files on or off another old machine, check out this Simple Universal Modem or consider Using a Raspberry Pi as a Virtual Floppy Drive.

Why Learn Ancient Tech?

The inner orbits of the Hackaday solar system have been vibrating with the announcement of the 2022 Hackaday Supercon badge. The short version of the story is that it’s a “retrocomputer”. But I think that’s somehow selling it short a little bit. The badge really is an introduction to machine language or maybe a programming puzzle, a ton of sweet blinky lights and clicky buttons, and what I think of as a full-stack hacking invitation.

Voja Antonic designed the virtual 4-bit machine that lives inside. What separates this machine from actual old computers is that everything that you might want to learn about its state is broken out to an LED on the front face, from the outputs of the low-level logic elements that compose the ALU to the RAM, to the decoder LEDs that do double-duty as a disassembler. You can see it all, and this makes it an unparalleled learning aid. Or at least it gives you a fighting chance.

So why would you want to learn a made-up machine language from a non-existent CPU? Tom Nardi and I were talking about our experiences on the podcast, and we both agreed that there’s something inexplicably magical about flipping bits, calling the simplest of computer operations into action, and nonetheless making it do your bidding. Or rather, it’s anti-magical, because what’s happening is the stripping away of metaphors and abstractions. Peering not just behind, but right through the curtain. You’re seeing what’s actually happening for once, from the bottom to the top.

As Voja wrote on the silkscreen on the back of the badge itself: “A programmer who has never coded 1s and 0s in machine language is like a child who has never run barefoot on the grass.” It’s not necessary, or maybe even relevant, but learning a complex machine in its entirety is simultaneously grounding and mind-expanding. It is simply an experience that you should have.

Printed Axial Generator Is Turned By Hand

While desktop 3D printing is an incredible technology, it’s got some pretty clear limitations. Plastic parts can be produced quickly in a 3D printer but can be more expensive or take longer to make than parts from materials like wood. Plastic parts can also be weaker than materials like metal. If a 3D printer is all you have on hand, though, you can often make some design choices that improve the performance of a plastic part over other materials. That’s what [1970sWizard] did to make this axial hand-cranked generator.

Besides a few pieces of off-the-shelf hardware and the wire and magnets, the entire generator is printed. The actual generator is made from coils of wire with exposed leads which snap into a plastic disc which acts as the generator’s stator. The magnets also snap into a separate disc which is the rotor of the generator and is attached to the drivetrain, with no glue or fasteners required. A series of gears on two other axes convert the torque from the hand crank into the high speed necessary to get usable electricity out of the generator.

The separate gear shafts were necessary to keep from needing a drillpress, which would have allowed fewer axes to be used. This entire machine can be built almost entirely with a desktop 3D printer, though, which was one of the design goals. While it’s largely a proof-of-concept, the machine does generate about 100 mW of power which is enough to slowly charge USB devices, power lights, or provide other sources of very small amounts of energy. If you do have access to some metalworking tools, though, take a look at this hand-cranked emergency generator.

Continue reading “Printed Axial Generator Is Turned By Hand”