3D Printing Industry reviews the Snapmaker 2.0 3D printer.
Designed and manufactured by Shenzhen-based Snapmaker, the Snapmaker 2.0 is a 3-in-1 modular FFF 3D printer with CNC machining and laser engraving/cutting capabilities. Intended as a successor to the company’s debut Snapmaker Original system, the desktop machine started out as a very successful Kickstarter campaign, raising $7.8 million with over 7,000 backers.
Now commercially available in three different models, the smaller A150 ($1,199), the mid-range A250 ($1,499), and the large-format A350 ($1,799), the Snapmaker 2.0 aims to make waves in the 3-in-1 manufacturing engine market. For this review, we’ll be working with the top-of-the-line A350.
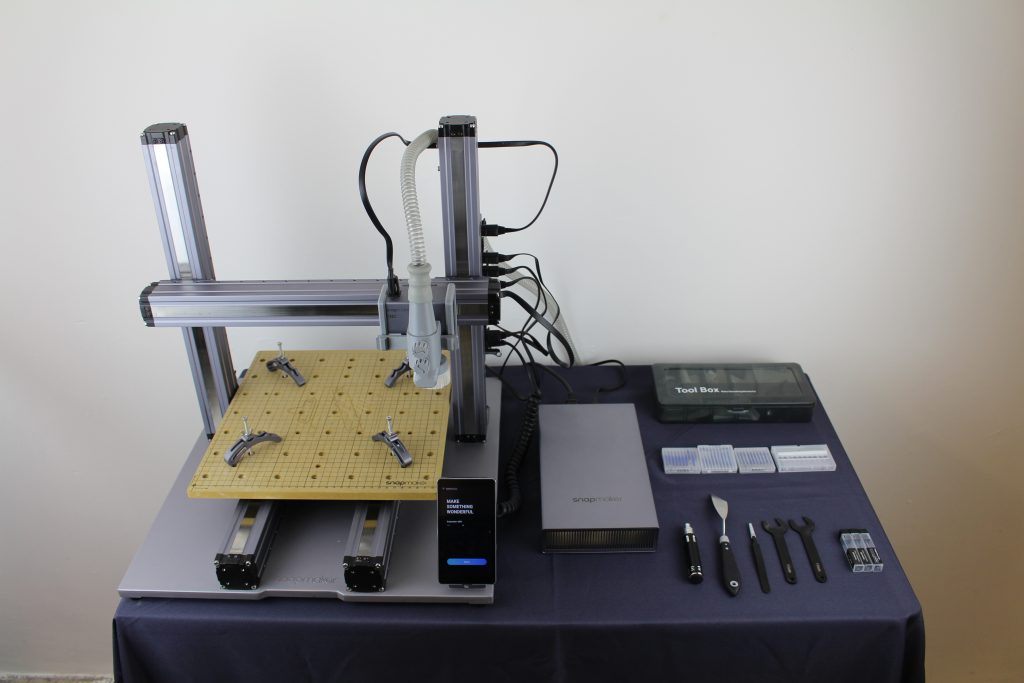
The Snapmaker 2.0 is undeniably built for the workshop and provides users with all of the manufacturing capabilities a DIY enthusiast could possibly want. When needed, users can switch out the single 3D printing head for a CNC tool or a laser diode, meaning the sky’s the limit when it comes to creative potential. This isn’t to say the system is inaccessible, however, as all of the setup steps are laid out in the comprehensive instruction manual and all of the necessary hand tools can be found in the box.
With prices starting at a surprisingly affordable $1,199, the system is suitable for just about anyone looking to get their craft on, including professional engineers, designers, educational institutions, and even advanced prosumers.
Seeing as Snapmaker has dedicated itself to 3-in-1 manufacturing systems, the company also offers a number of add-ons for use with the Snapmaker 2.0, including an Enclosure and a Rotary Module. We’ll cover all of these and more in this review.

A 3D printer, first and foremost
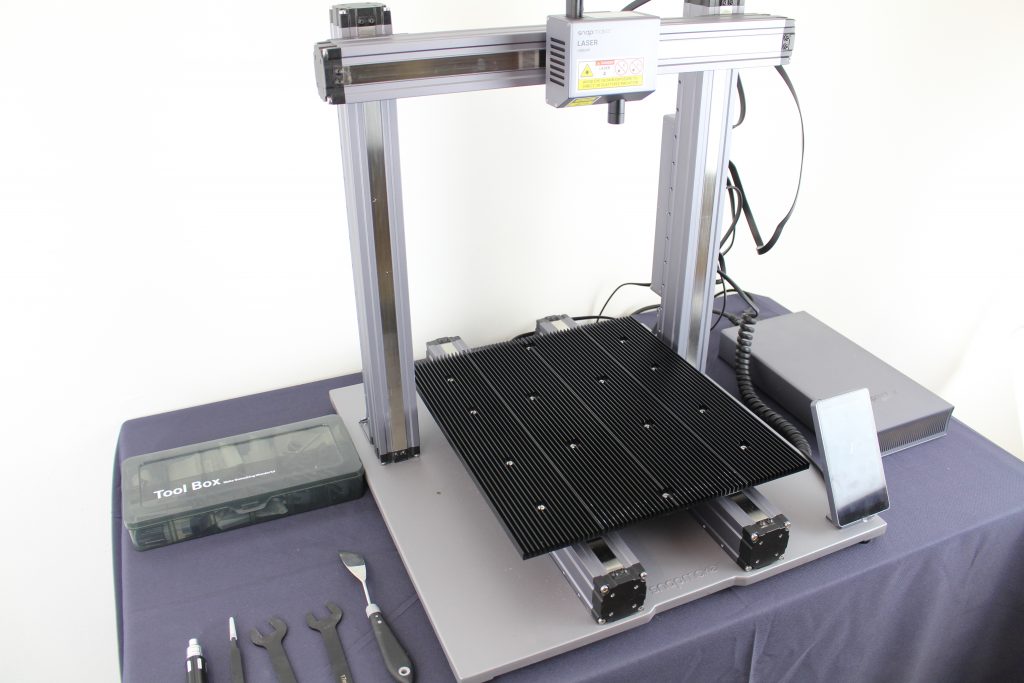
At its core, the Snapmaker 2.0 is still an FFF 3D printer. Sporting a cartesian coordinate system, the machine features a sleek, notably sturdy anodised aluminum chassis with an open form. The largest of the three models, the A350 variant, comes complete with a build volume measuring 320 x 350 x 330mm. This is significantly larger than the average desktop 3D printer, so it should provide ample leeway for most reasonably-sized engineering projects.
We found the system’s single printhead to be lightweight and very well-designed, with a magnetic sensor as standard. The maximum nozzle temperature clocks in at 275°C. Equipped with a direct drive extruder, this configuration should have no problems printing with materials such as PLA, ABS, PETG, and TPU.
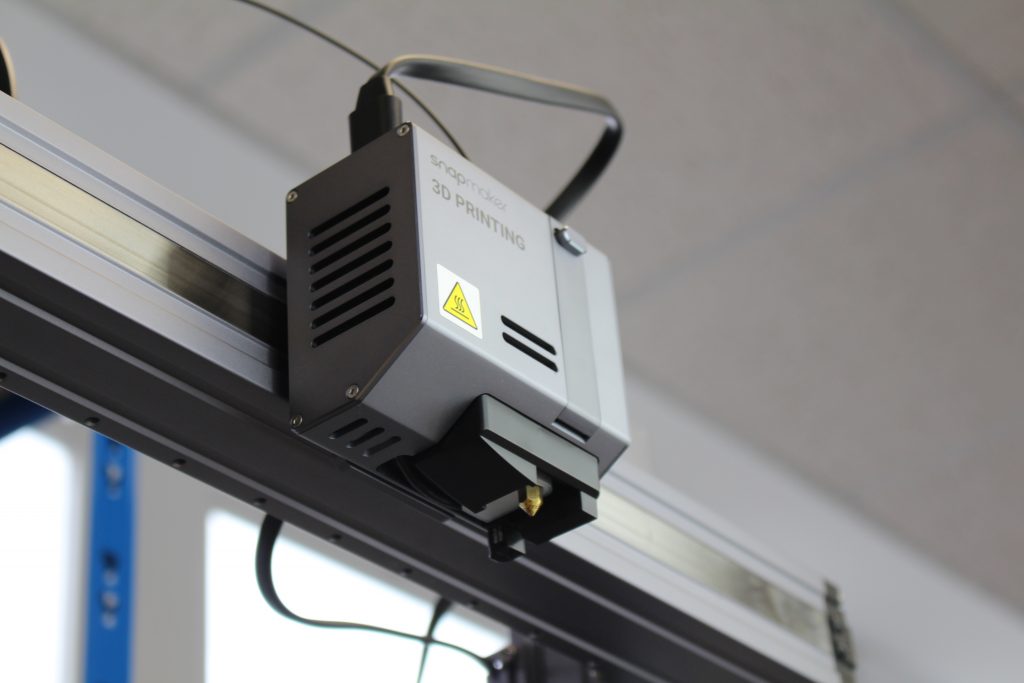
Turning to the build plate, Snapmaker has chosen to implement a magnetic print bed with glued-on, smooth build surfaces on either side. If one of the faces were to sustain damage, the user would simply be able to flip the bed over and use the other side – a small but welcome consideration. The bed heats up to a maximum of 80°C, which is crucial for part adhesion and to prevent warping on the undersides of prints.
It’s also worth mentioning that the Snapmaker 2.0 is equipped with a Cortex-M4 processor (Quad Core A7 CPU at 1.1GHz) and an Android controller. Recently, we’ve seen a few manufacturers implement Android into their higher-end 3D printers, and it absolutely makes all the difference when it comes to user experience. The 5” full-color touchscreen on the Snapmaker is extremely responsive and provides a beautiful graphical UI, which itself can be used to preview print models, calibrate the bed, load the filament, and manage print jobs. The system also features Wi-Fi functionality, which is always a godsend for remote work.
Unfortunately, the bed calibration process is really where the Snapmaker 2.0 falters. The company has opted for an automatic multi-point leveling system, which works based on a magnetic proximity sensor. This often posed a challenge when trying achieve a successful first layer.
Unlike other similar printers, the Snapmaker’s bed doesn’t have any physical screws to manually increase or decrease the distance to the nozzle either. It also doesn’t have any springs on which to rest the build plate. This combination (or lack thereof) makes it extremely difficult to achieve a flat, horizontal bed that is parallel to each axis.
Instead, once the system deems itself flat, the user can modify the Z-offset via the touchscreen, with increments as small as 0.05mm. While this works well enough to achieve a successful print, the first layer is often flawed and just getting to that point is unnecessarily difficult. Therefore, we advise 3D printing with a raft on this printer. This will help reduce the error of the first layer.
Laser engraving and CNC machining
Of course, the Snapmaker 2.0 isn’t just a 3D printer. The 3-in-1 machine also comes complete with its own laser cutting/engraving and CNC Modules, which the user can simply screw on in place of the 3D printing head. Additionally, the system has an extensive aftermarket, meaning there are a plethora of add-ons and extra modules to play around with (more on these shortly).
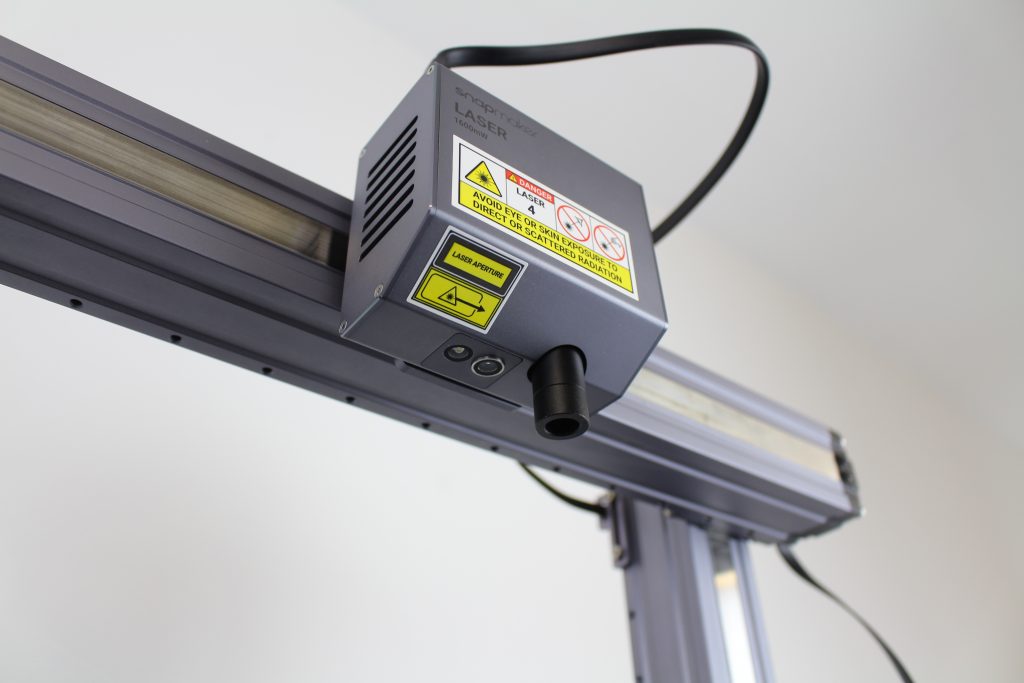
Firstly, we’ll have a look at the core ‘out-the-box’ modules included with the printer itself – the laser cutter and the CNC. The laser cutter is a blue Class 4 diode, and operates at 1.6W with a wavelength of 450nm. Designed in-house by Snapmaker, the module looks as elegant as the 3D printer head, but it also features an in-built camera to preview designs before engraving.
The module offers four main functions depending on the application: Black and White, Greyscale, Vector (outline cutting), and Text. The laser is compatible with a number of substrate materials, including wood, acrylic, polymers, and even leather. It’s worth noting that the system also comes with a purpose-built aluminum lasering table, which does a great job of reducing reflectivity.
Although the user will have to recalibrate the laser cutter every time a module switch is made, we’re happy to announce that the automatic process works significantly better than that of the 3D Printing Module.
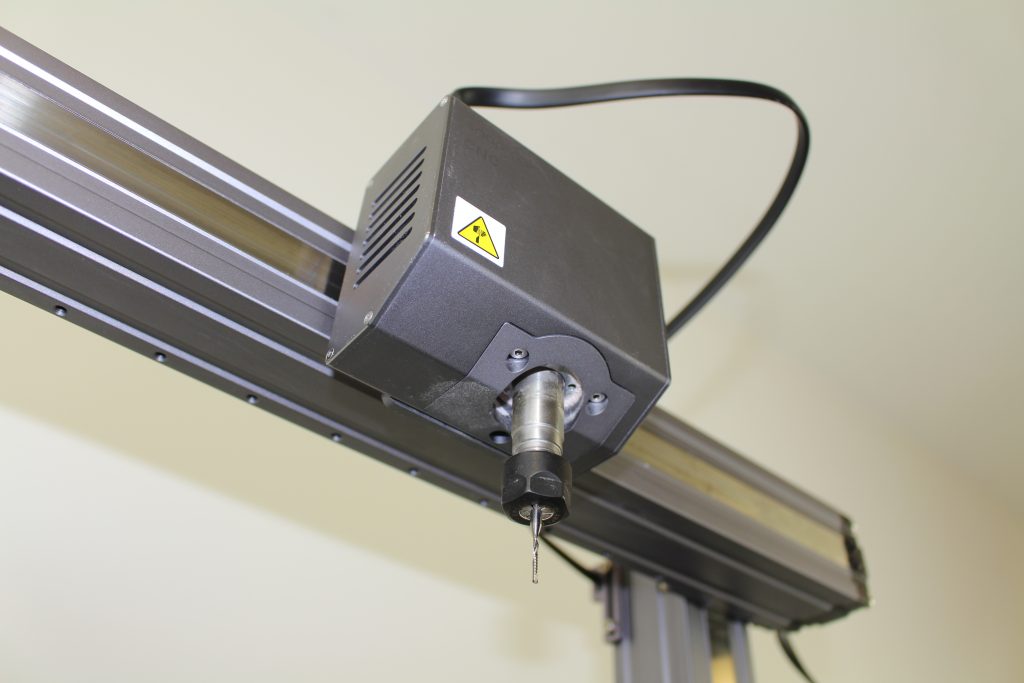
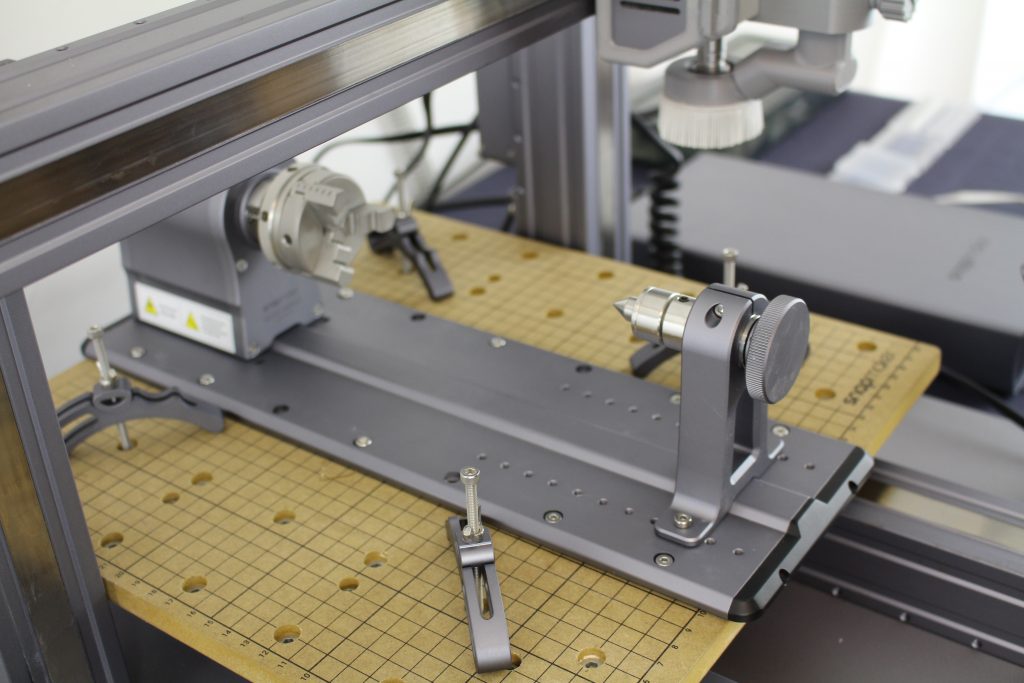
On the other hand, users can also turn the Snapmaker 2.0 into a CNC router by swapping in the subtractive toolhead. This CNC Module has an ER11 collet that can hold hundreds of different third-party bits ranging from 0.5mm – 6.35mm (0.02” – 0.25”) in diameter. The spindle speed can also be varied between 6,000 – 12,000 RPM.
Much like the laser engraver, the CNC Module also has its own dedicated machining bed, which is a removable MDF wasteboard. Dotted around the board are a series of embedded threads, into which the user can screw up to four clamps. These clamps are used to hold the workpiece in place as it is milled, and they do a mighty fine job of it – no complaints there.
When it comes to core functions, the CNC head offers Text, Relief, and Vector, again depending on the application. Text and Relief are used to engrave text and images respectively, while Vector is used to cut out object outlines.
Optional add-ons
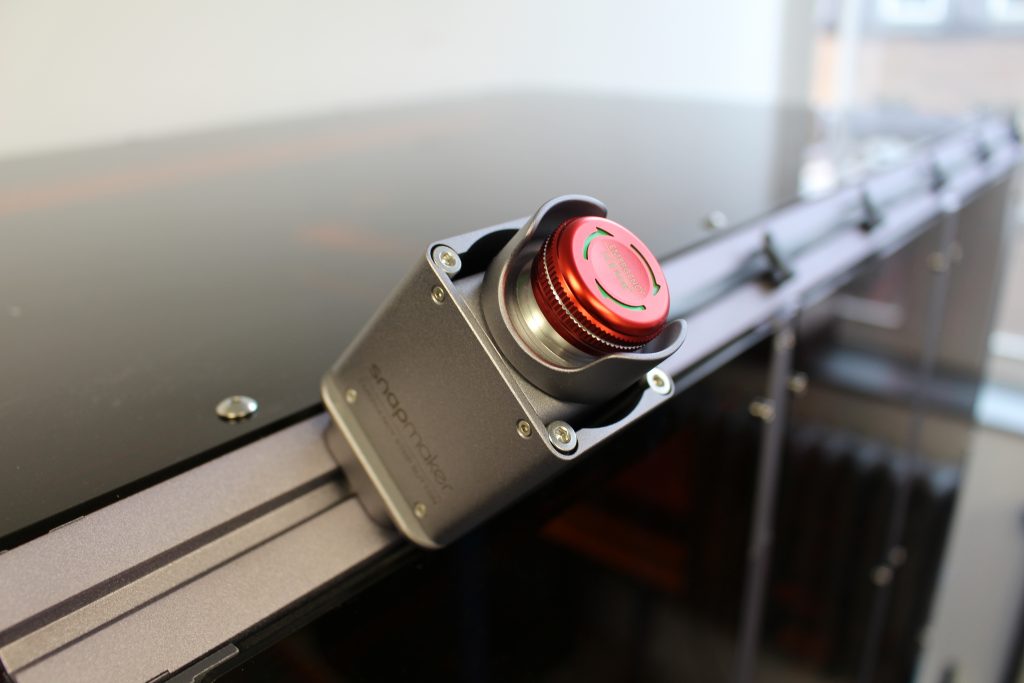
Snapmaker also very kindly sent us three optional add-ons to try out with the system: an Enclosure, a Rotary Module, and an Emergency Stop Button.
Made of high-quality anodized aluminum, the Enclosure can be used with all three core modules. For the 3D Printing Module, it helps maintain the temperature in the build chamber, which is crucial for printing with higher temperature filaments such as ABS. When used with the laser engraver, the filtering panels help protect the user’s eyes, and with the CNC Module, it can keep swarf and material chippings from flying around the workshop.
Additionally, the Enclosure also features an exhaust duct to extract odors and hazardous particles from the workspace, meaning we were able to conduct all of our testing indoors safely and comfortably. There is even a built-in kill switch that automatically stops the Snapmaker 2.0 if the door of the Enclosure is open. All in all, we thought the Enclosure just provided too much value to pass up. It’s a must-have addition to the Snapmaker 2.0.

Moving on, we also gave the Rotary Module a spin. Much like a lathe, the Rotary Module spins a workpiece in the horizontal plane. Designed to be used in conjunction with the laser engraver or the CNC tool, this optional module works best with cylindrical and rectangular cuboid substrates, whereby images and texts can be engraved or cut all around a continuously spinning object.
Finally, we also had an opportunity to try out a big red Emergency Stop Button. There’s not much to say other than the fact that it works as intended and stops the Snapmaker 2.0 dead in its tracks (although this really should be included in the box, rather than being an optional add-on).
Snapmaker Luban slicing software
Snapmaker provides its own slicing software for use with the Snapmaker 2.0, and it’s called Snapmaker Luban. Characterized by its well thought-out grey and blue UI, the program operates very similarly to most other FFF slicers on the market. The basic translation, rotation, and rescaling functions are all there and responsive. However, we discovered that the software was lacking some of the more complex process parameters, which may be a problem for advanced users.
Naturally, Luban also has the ability to generate gcode for the laser and CNC Modules, with options for the various manufacturing modes of each. It is compatible with Autodesk Fusion 360 for CNC operations and Cura for 3D printing operations.
Still, we found Luban to be one of the more intuitive slicing platforms we’ve used here at 3D Printing Industry, and everything from the automatic support generation to the default print profiles work as expected. Ultimately, all that’s needed to pick up the intricacies of the software is a little trial and error and a dash of common sense.

Benchmarking the Snapmaker 2.0 A350: 63/100
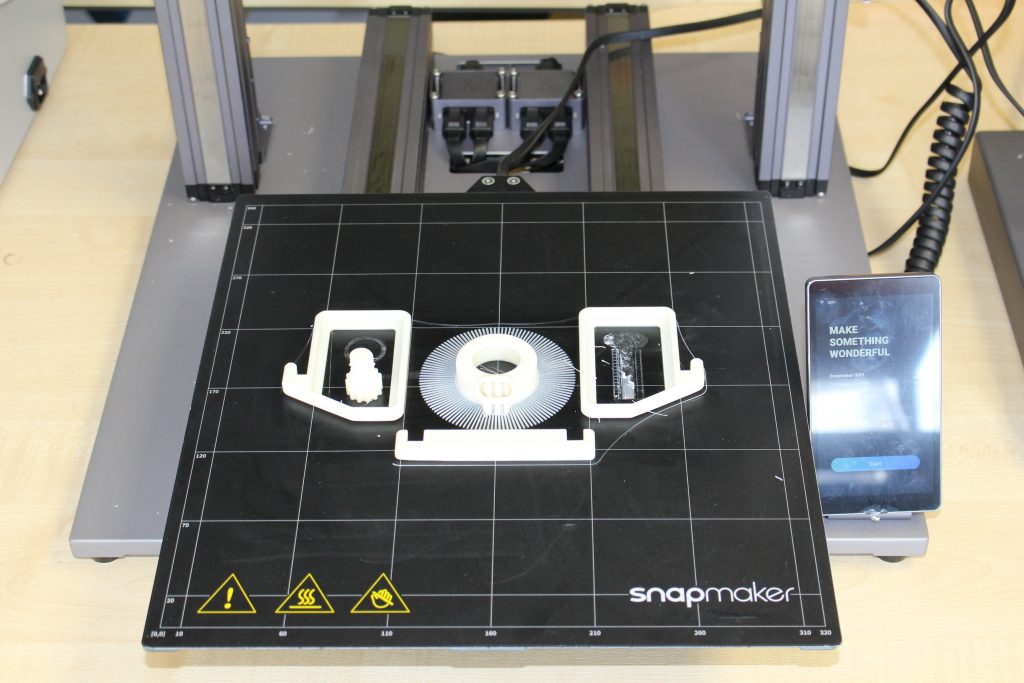
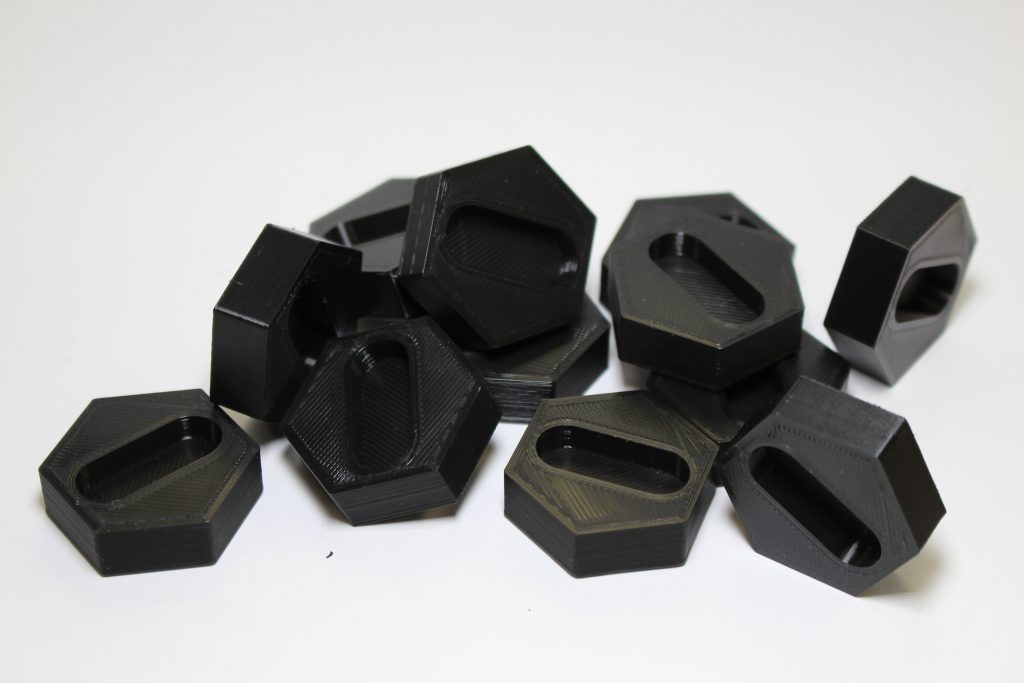
It’s time to see what the Snapmaker 2.0 3D printer is really capable of. We start off with 3D Printing Industry’s own benchmarking model in PLA, which consolidates many of our smaller print tests into one comprehensive part.
For this test, we assign each of the individual sections a weighted score based on factors such as dimensional precision, surface quality, and structural integrity. The A350 earned an overall 3D Printing Industry score of 63/100 – a good professional-grade 3D printer is a 60+. Below you’ll find some bell curves depicting the repeatability of the Snapmaker.
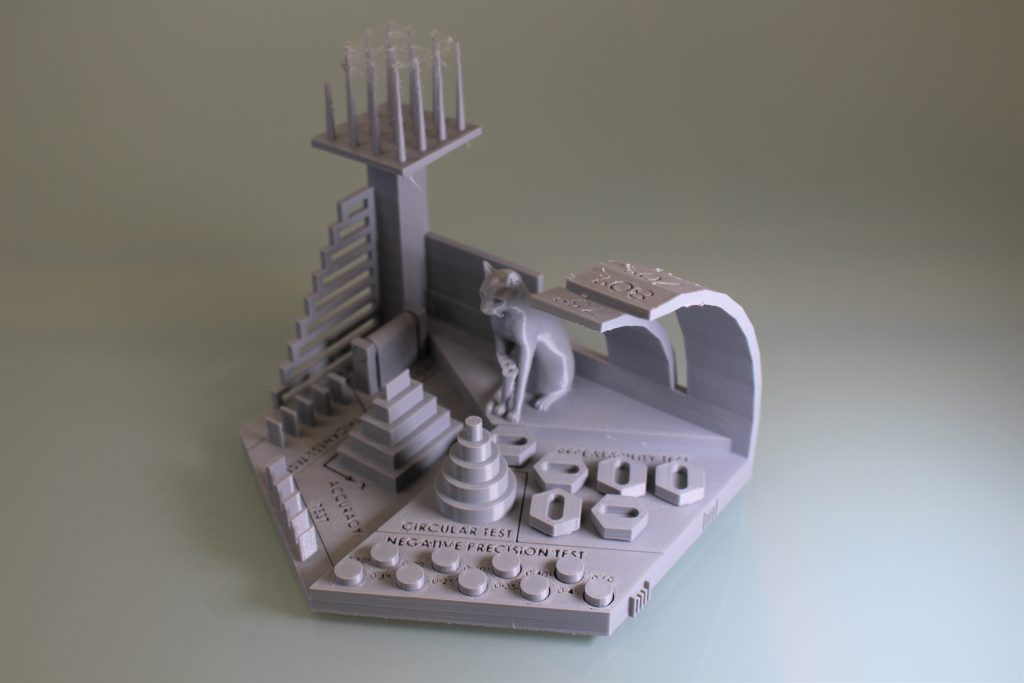


The Snapmaker’s performance was around average for this test, as it 3D printed most of the individual sections to a decent standard. Overhangs were printed successfully up to 60° without any problems, and the horizontal bridging test was printed straight up until the 30mm mark. There was some minor stringing in the retraction test but nothing that can’t be removed in post-processing, and the spiked structures themselves are solid with an acceptable surface quality.
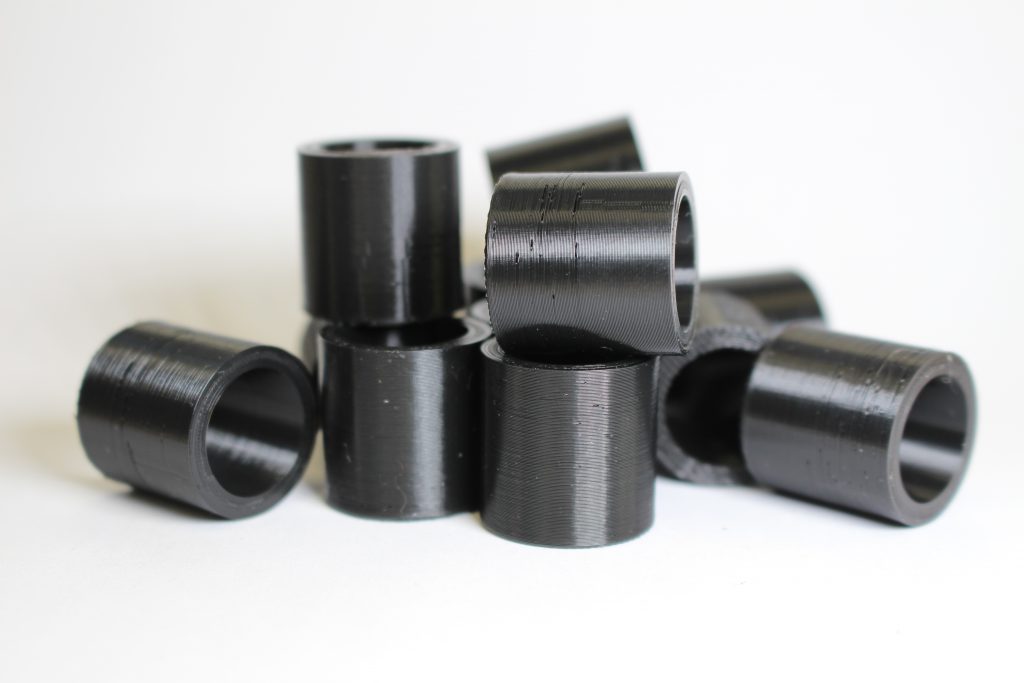
However, the leveling process let down the system in the negative precision test, since the printed tubes can’t be removed all that easily – we only managed to pull off three of them. We thought this might have something to do with the flatness of the first layer, seeing as the base of the tubes seem to be stronger than they should be.
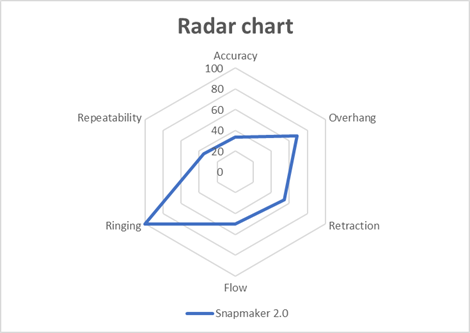
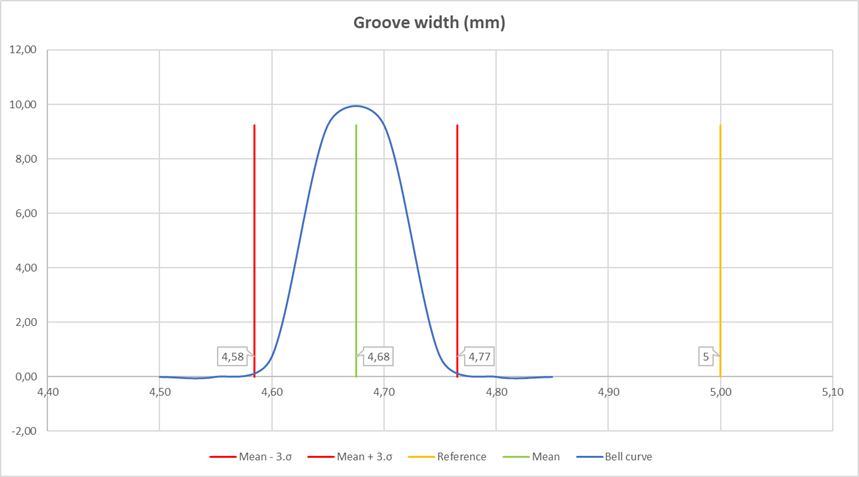
We then 3D printed a circular trajectory test to see how the Snapmaker would handle circular structures. By studying the normal distribution of the concentric circles’ diameters, we can say that the printer offers sufficient repeatability when the mean of difference is under 0.1mm and the standard deviation is under 0.05mm. Our measurement devices are accurate to ±0.015mm.
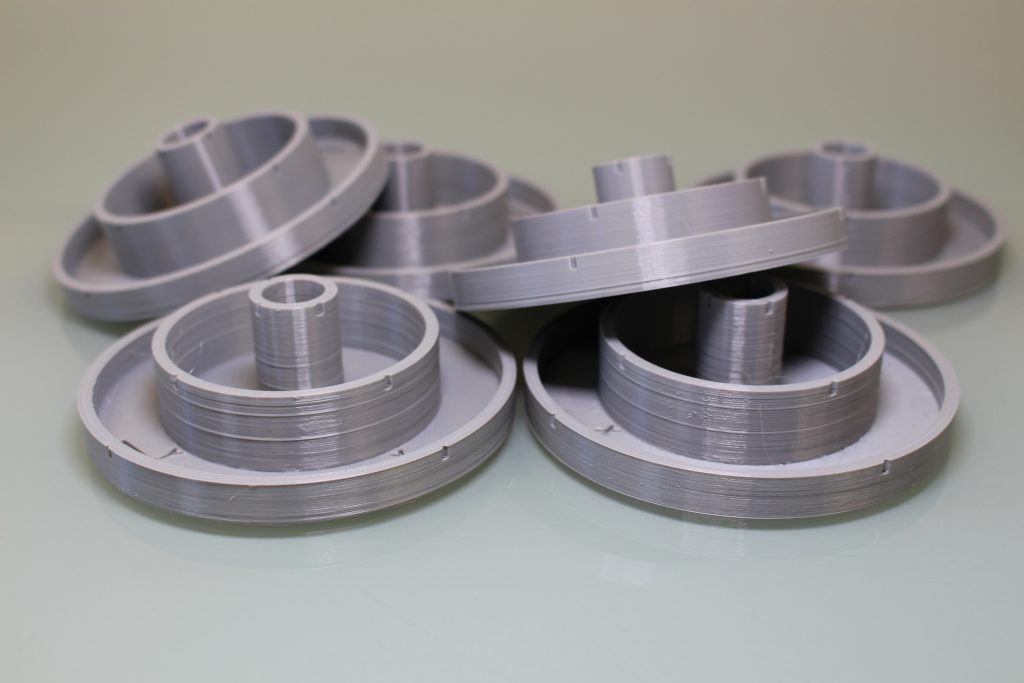
The Snapmaker certainly surprised us with some strong results here, delivering an average offset of just 0.115mm for the X axis, and 0.085mm for the Y axis. This resulted in an average of 0.091mm for all axes. The average standard deviation also came in low at 0.035mm, where 0.05mm is a good target. For context, industrial FFF 3D printers often boast dimensional accuracies of up to 0.1mm, which qualifies them for applications such as high-precision automotive tooling.
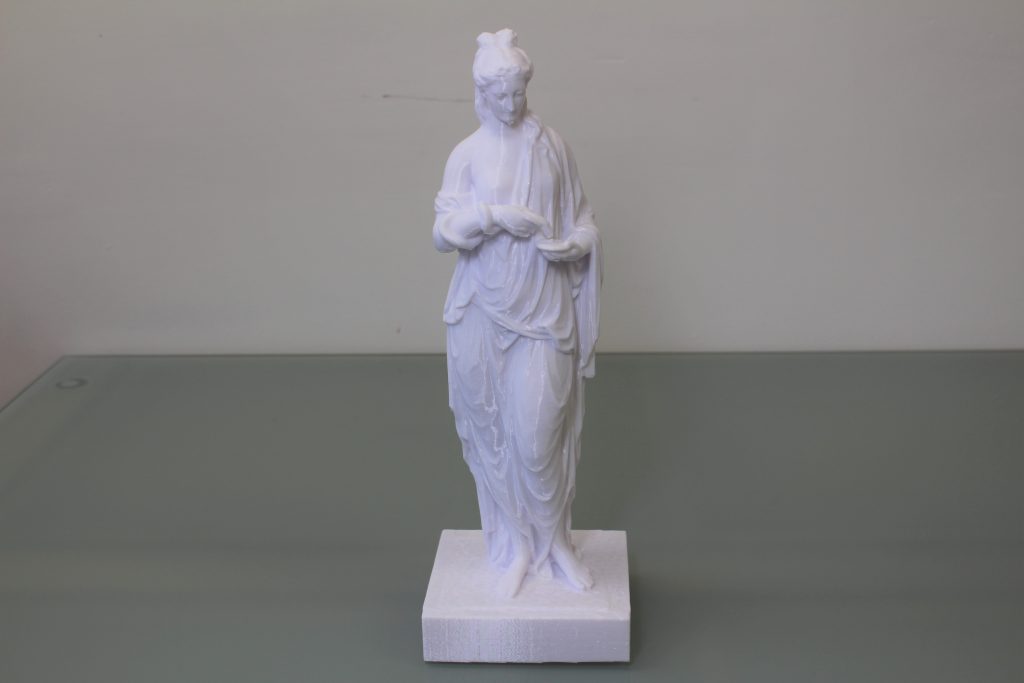
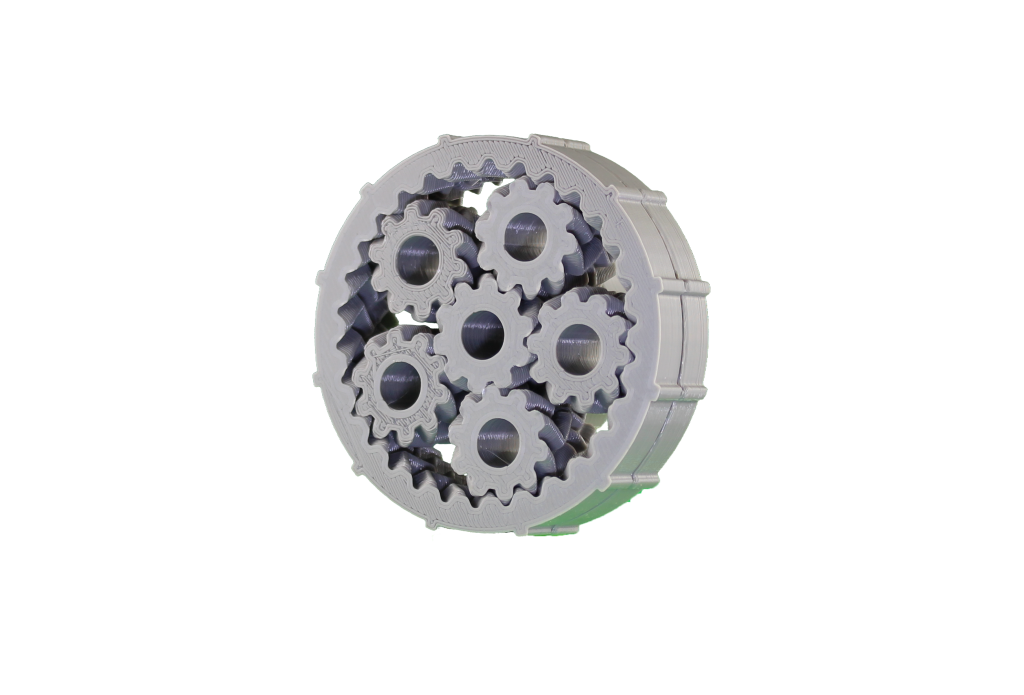
As with all of our reviews, we also had the system print an artistic model to see how it might handle itself out in the real world. This time, it was a Statue of Hygieia, which can be found in the gardens of Schönbrunn Palace in Vienna. Overall, the Snapmaker 2.0 held its own admirably, with smooth surfaces and well-preserved features. The only real defects on the print were scarring from some of the more difficult-to-remove support structures, along with imperfections on the underside of the model as a result of poor leveling.
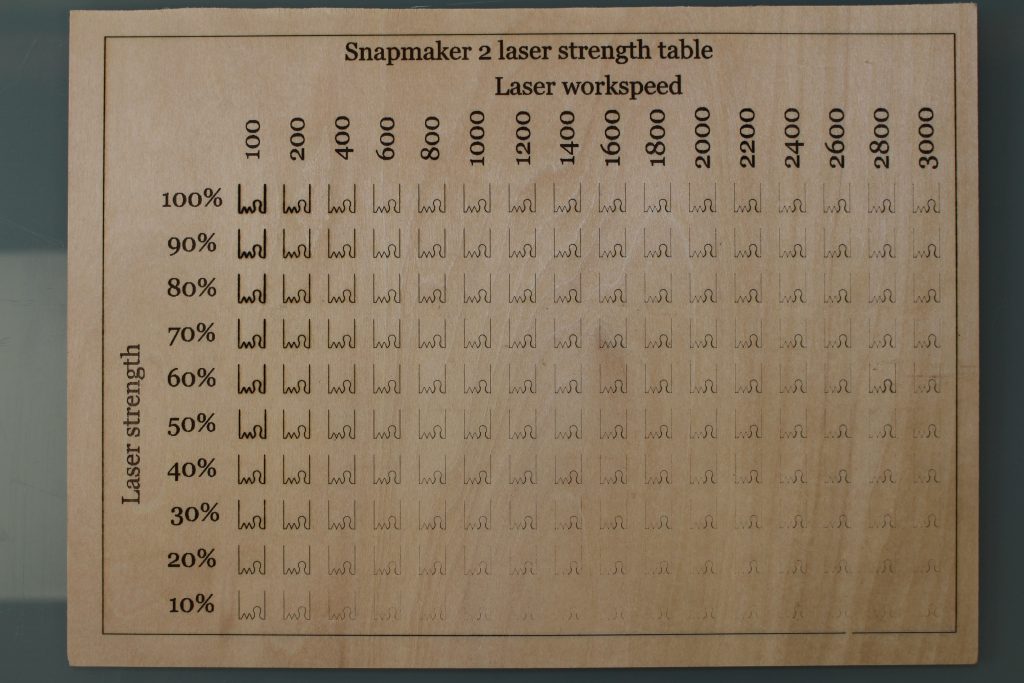
Moving on, we tried our hand at some cutting and engraving tests with the Laser Module. First up, we pushed the limits of the machine by cutting and engraving test matrices in plywood. We did this in order to evaluate the quality of the laser and to better understand the differences in the parameters – feel free to use our results as a guide for your own projects. The best parameter combinations are the ones with definitive edges, solid infills, and minimal burning on the outer rim.

Next up were a set of flat laser engraving tests: one was done on a leather wallet and the other was a world map on plywood. Both of these tests were conducted using the ‘Greyscale’ mode on Luban.
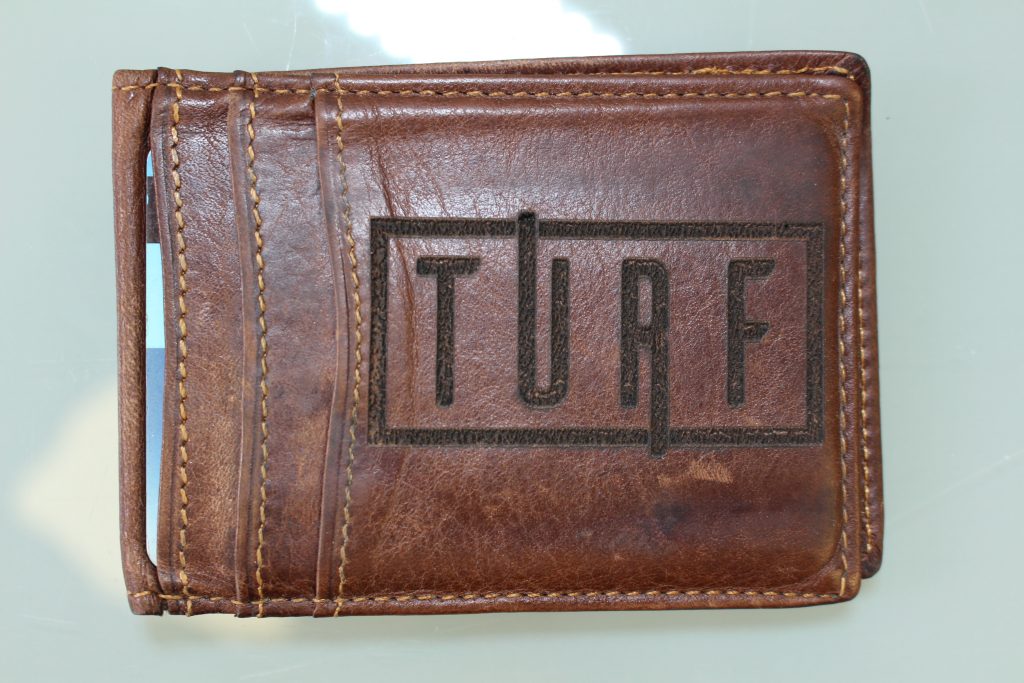
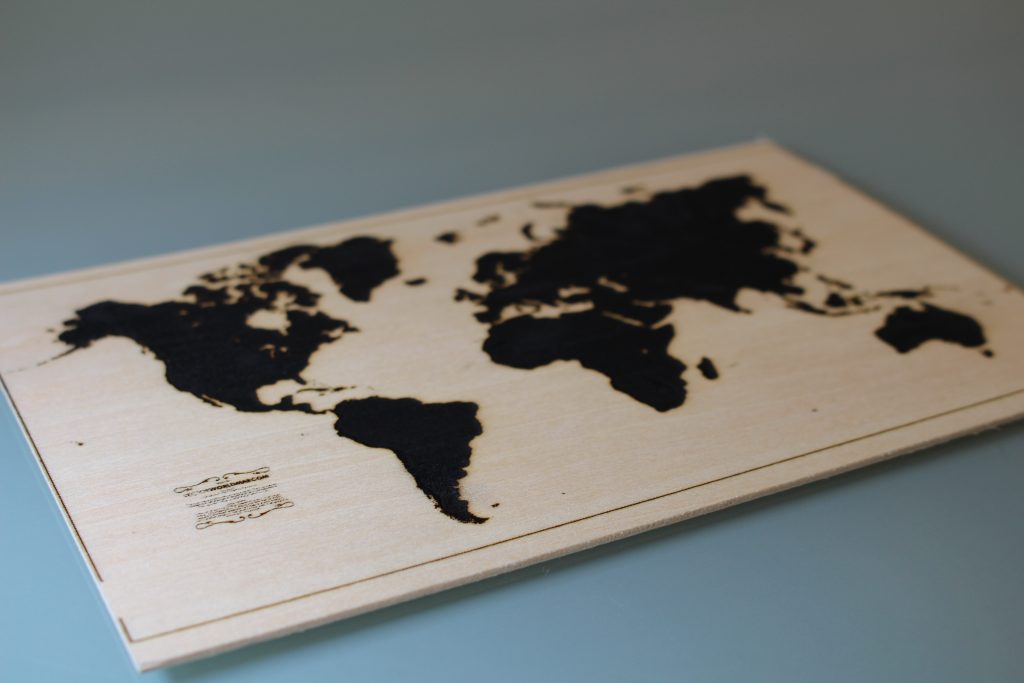
We were very impressed at just how clean each of these jobs came out, as both the logo and the map had extremely clean edges with virtually no burn-induced fuzz. The leather wallet, in particular, ended up with this rough, almost rocky texture that felt awesome to touch.
Then, we decided to try out the cutting capabilities of the laser with three distinct projects. The Snapmaker-designed gift box and the 3D Printing Industry keychain were done in plywood, while the laptop sticker was cut out of vinyl. All three cutting tests used the ‘Vector’ mode on Luban (the engravings used ‘Greyscale’).
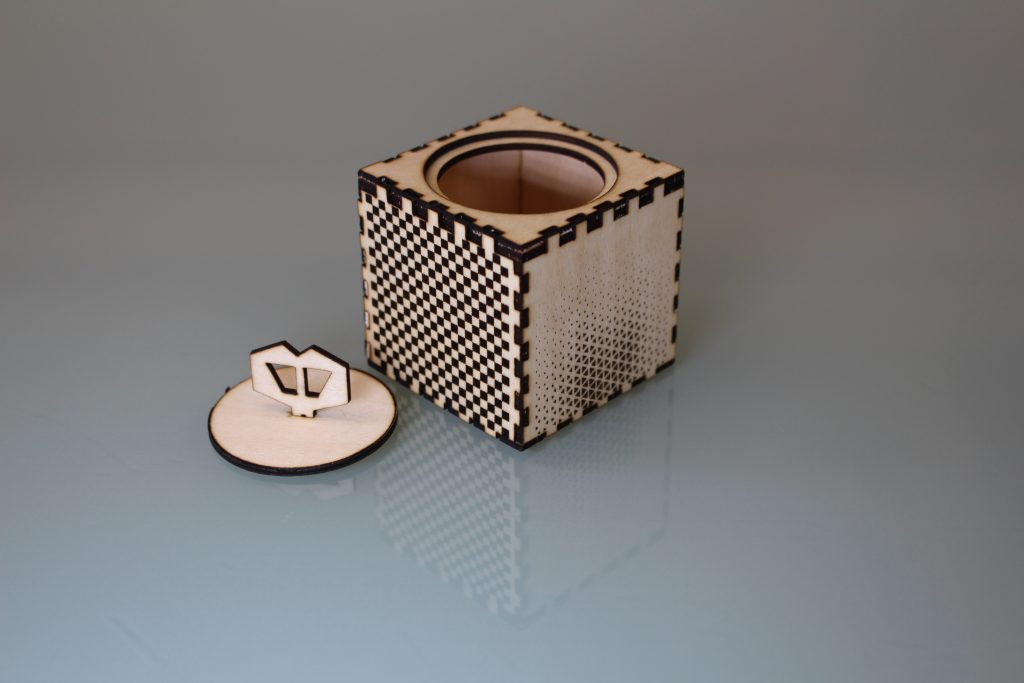
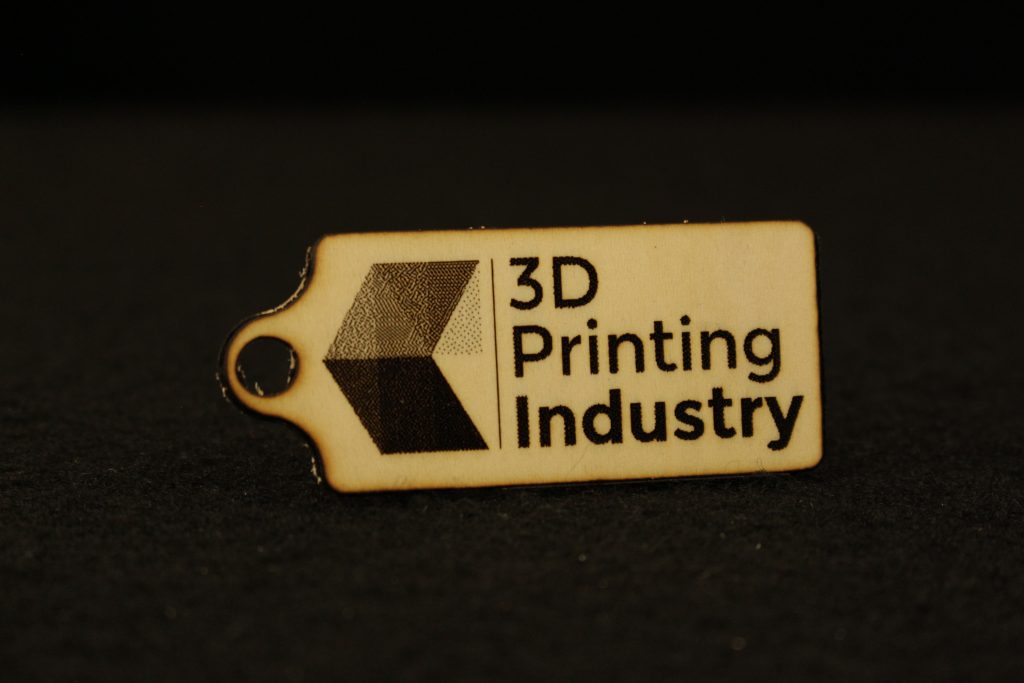

Once again, we were very impressed with the performance of the laser cutter. The gift box was precise enough to be assembled with ease, and the vinyl sticker looks like it was manufactured professionally by a specialist. The 3D Printing Industry keychain even managed to emulate the color scheme of our logo, despite it all being in greyscale.
Happy with the performance so far, we then used the laser engraver in conjunction with the optional Rotary Module, which enabled us to engrave a series of images and texts into spinning objects. The rotary laser tests were as follows: London Bridge on cardboard, manufacturing text on a PLA bullet, a chemicals symbol on a transparent PP beaker, and the London Underground logo on a ceramic mug.
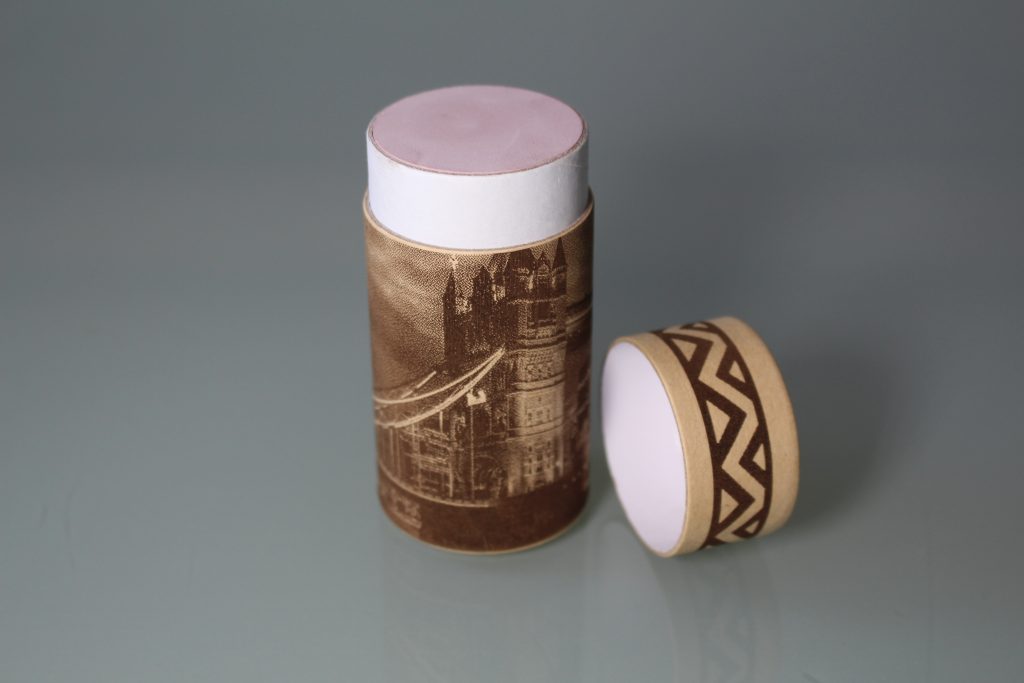
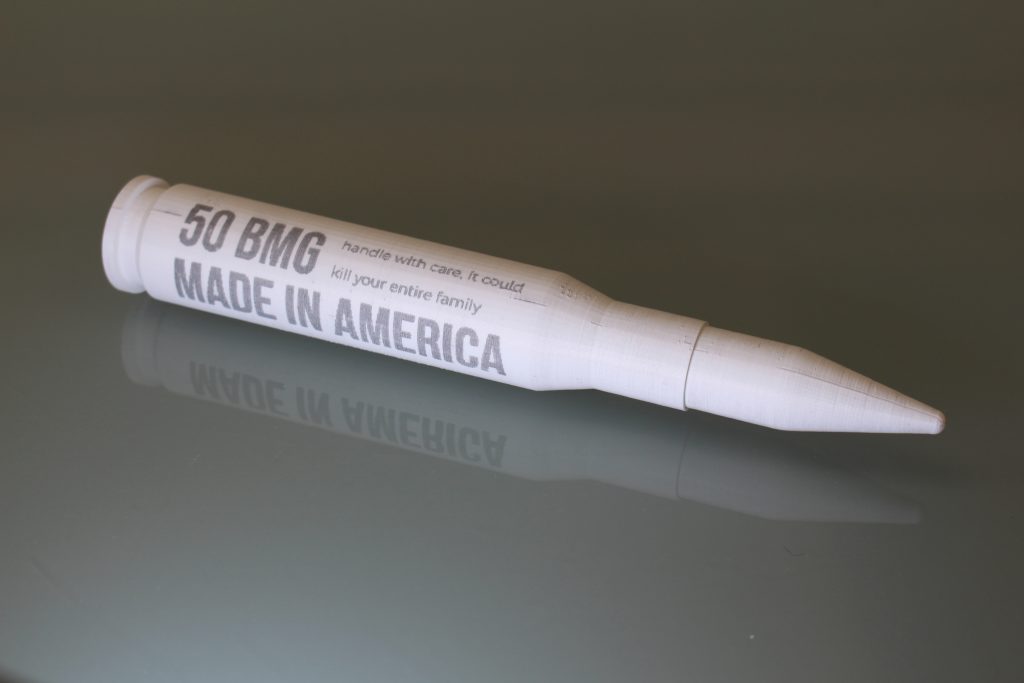
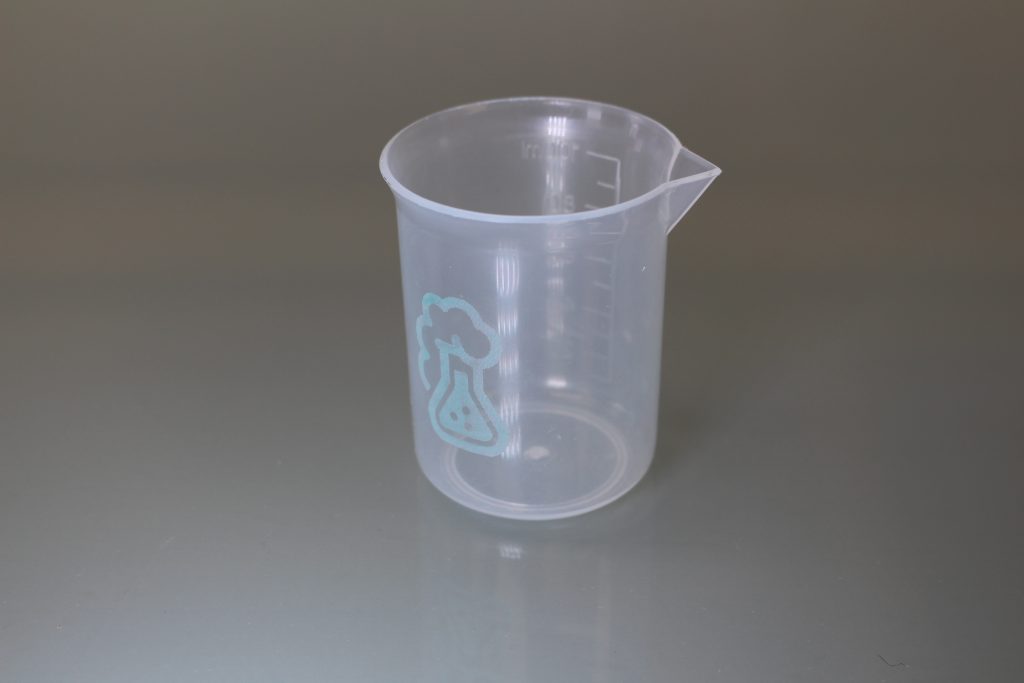

The cardboard, the PLA, and the PP handled the laser beautifully, with engraving densities of 7, 4, and 4 dots/mm respectively. The London Bridge image was particularly stunning as it looked a lot like an old photograph from a distance. However, the ceramic mug is really where the cracks started to show, with the Underground logo looking patchy and faded. It’s worth noting that this was due to the material choice and the variable gradient of the mug’s curvature rather than the laser itself.
Moving onto the CNC Module, we machined a Snapmaker-designed smartphone holder made of a 3.2mm thick acrylic sheet. This CNC test used a flat end mill (1.5mm) running at 12,000 RPM and a 300mm/min work speed. We were glad to see the CNC performed exactly as expected, the parts ended up with a smooth finish, and they came off the work plate with ease. Moreover, the smartphone holder works perfectly – a big win.

Finally, we combined the CNC with the Rotary Module for four final benchmarking tests. These included an epoxy chess piece, an epoxy lion, an epoxy PolyPearl tower, and a wooden PolyPearl Tower (lime tree).
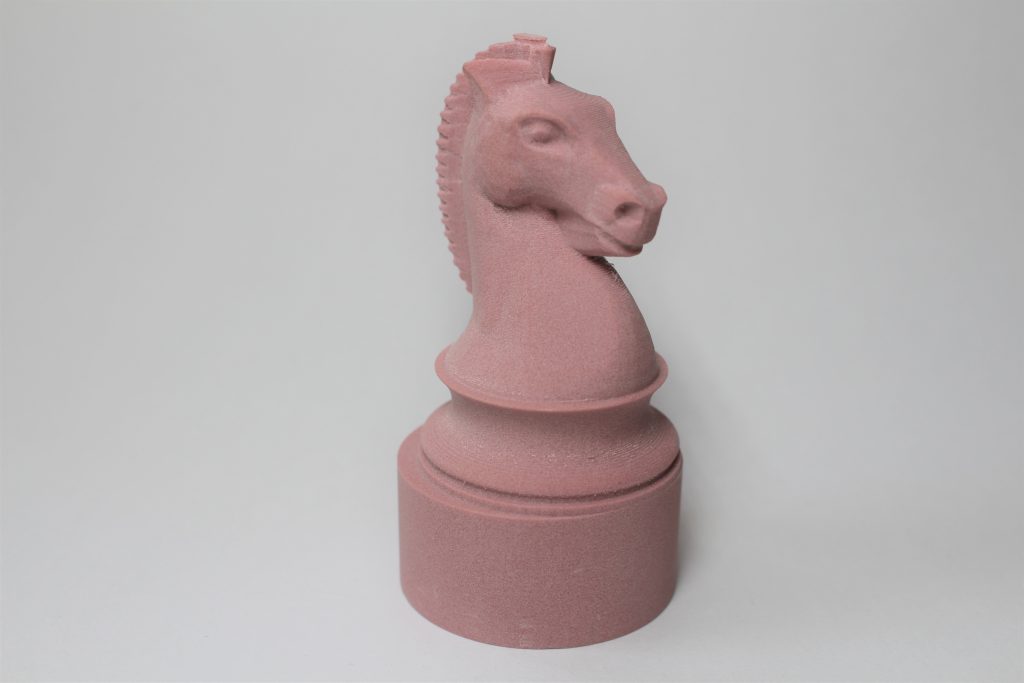
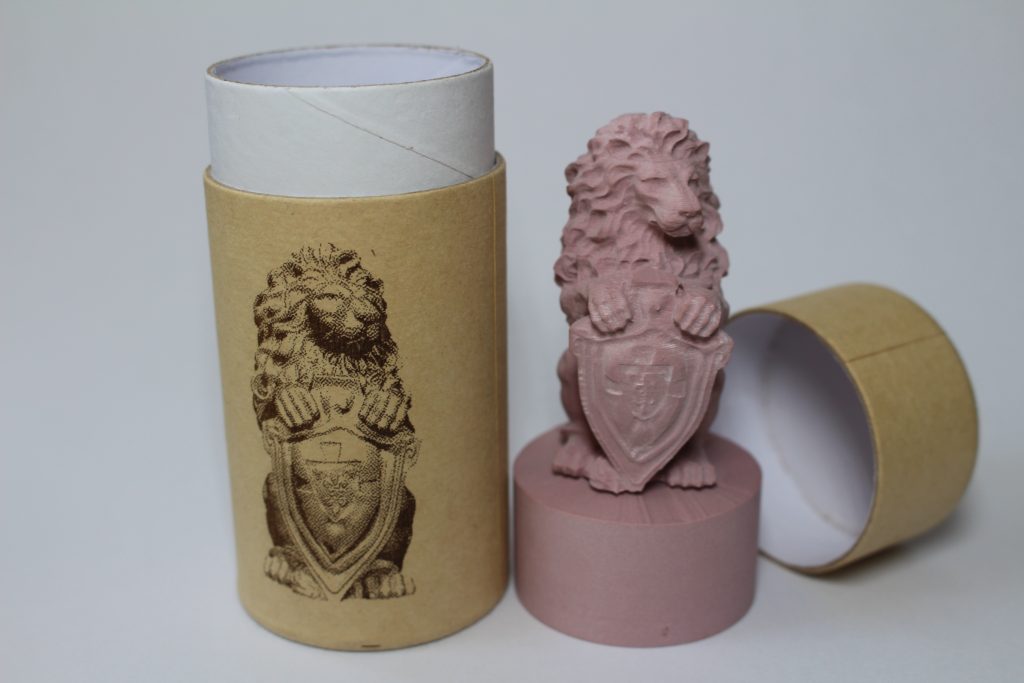
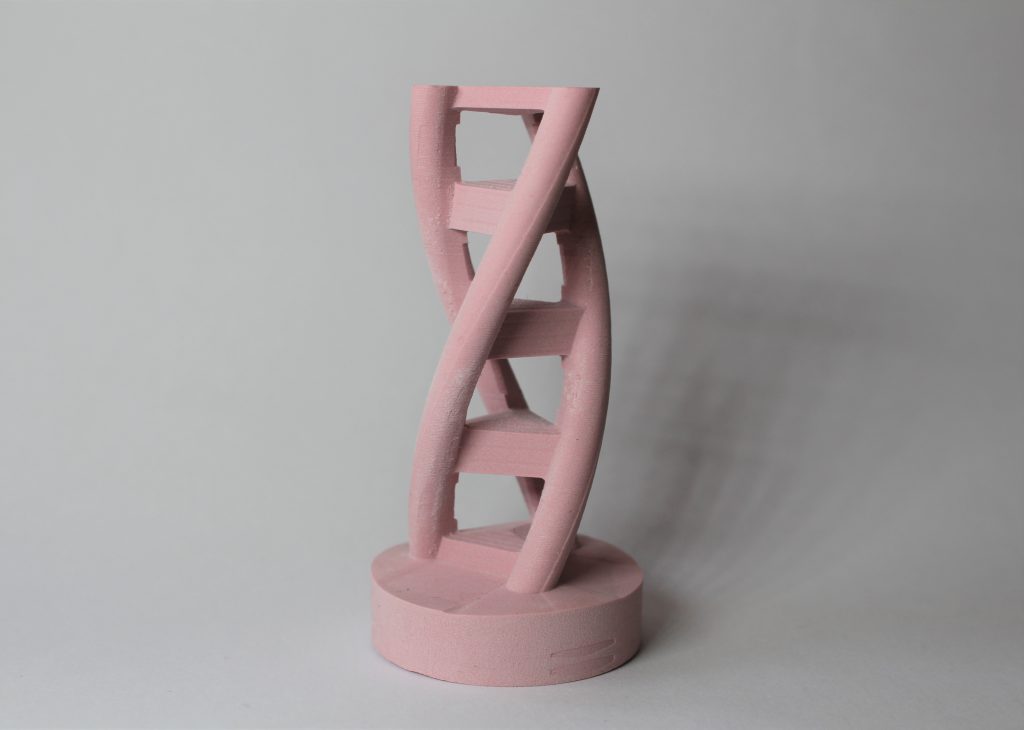
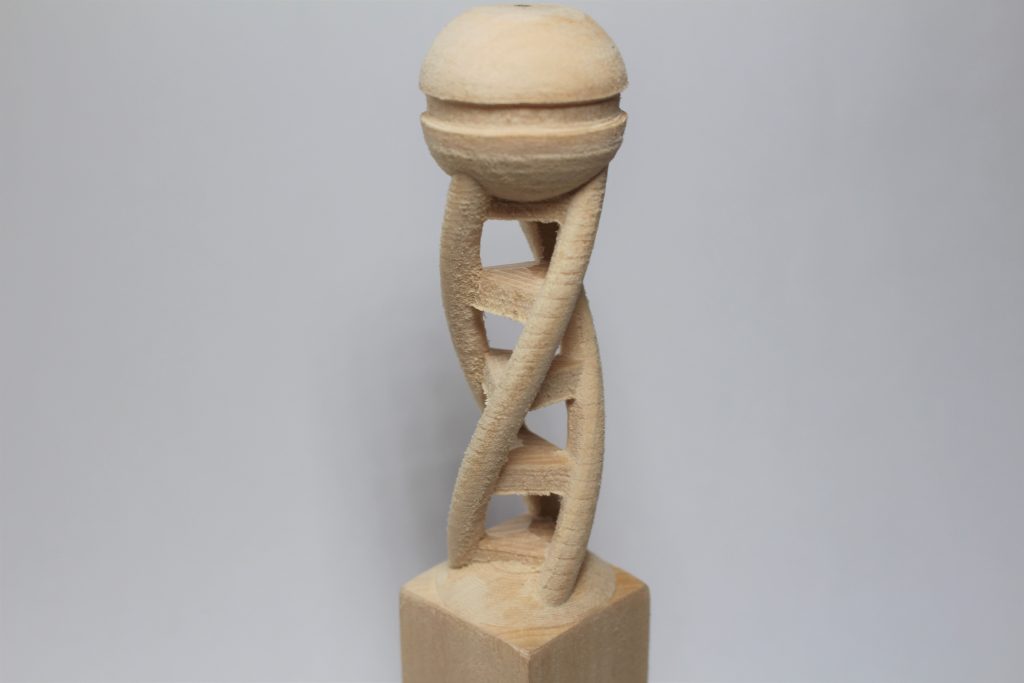
All we can say is wow. The CNC and the Rotary Module make one hell of a team. Our chess piece and lion came out incredibly detailed, with the passes of the toolhead barely visible to the naked eye. The same goes for the PolyPearl tower torture tests, as the helical geometries were machined with magnificent precision. The Snapmaker 2.0 really exceeded expectations here.
The verdict
Riding the coattails of its predecessor, the Snapmaker 2.0 managed to raise almost $8 million in its initial crowdfunding campaign, and it’s not hard to see why. Snapmaker clearly knows what it’s doing when it comes to 3-in-1 manufacturing systems, having built one of the most cost-effective workshop companions we’ve had the pleasure of reviewing.
Don’t get me wrong, the machine is far from perfect. The print quality is marginally above average, the 3D printer calibration process needs work, and the day-to-day operation is far too noisy for a close-quarters office environment.
Despite this, the Snapmaker 2.0 simply offers too much in such an affordable package to pass up. We’d go so far as saying the 3D printing capabilities of the system are the weakest, but the laser and CNC Modules carry their weight and then some. As far as optional add-ons go, the Enclosure is an absolute must and the Rotary Module can be a game-changer if you’re in the market for a good old spin.
Technical specifications (A350)
| Build volume | 320 x 350 x 330mm |
| Bed temperature | 80°C |
| Nozzle diameter | 0.4mm |
| Nozzle temperature | 275°C |
| Dimensions | 700 x 660 x 580mm |
| Connectivity | Wi-Fi, USB cable, USB drive |
| Layer resolution | 50 – 300 microns |
| Laser work area | 320 x 350mm |
| Laser power | 1.6W |
| Laser wavelength | 450nm |
| Safety class | Class 4 |
| CNC work area | 320 x 350 x 275mm |
| Shank diameter | 0.5 – 6.35mm |
| Spindle speed | 6,000 – 12,000 RPM |
Buy the Snapmaker 2.0 3D printer here. The system is available to order now, starting from $1,199.
Subscribe to the 3D Printing Industry newsletter for the latest news in additive manufacturing. You can also stay connected by following us on Twitter, liking us on Facebook, and tuning into the 3D Printing Industry YouTube Channel.
Looking for a career in additive manufacturing? Visit 3D Printing Jobs for a selection of roles in the industry.
Featured image shows the Snapmaker 2.0. Photo by 3D Printing Industry.