
Karl here. This will be a long one but I haven’t had this much fun with a product review in quite some time. I don’t consider myself a complete noob with CNC routers but I have only scratched the surface. Learning new things really drives me and being able to make more permanent things is very satisfying.
I have some experience with the Sainsmart 3018 CNC router. I had a lot of fun with it but the build volume was on the smaller side so really limited on what can be done with it. I still recommend it as a starter CNC router and as a good stepping stone to get your feet wet and the Genmistu PROVerXL4030 as the next step. I was able to make some cool things with the 3018 and I hope now to take it to the next level with the Genmistu 4030.
Before we get started here are the important specs:
- Working area – 400 x 300 x 110mm (15.75 x 11.81 x 4.33 inch)
- Frame – C Beam Structure and Linear Rails
- Control Board Compatibility – GRBL 1.1h
- Stepper Driver – TB6560
- Stepper Motors – NEMA 23 (2 Phase, 3A)
- Spindle – 300W 6A, 12,000 RPM
- Max speed – 2000mm/min
- Extra Mount – Aluminum DeWalt DWP611 Mount (DWP611 router not included)
- Power Supply – 600W, 7A, 0-48V
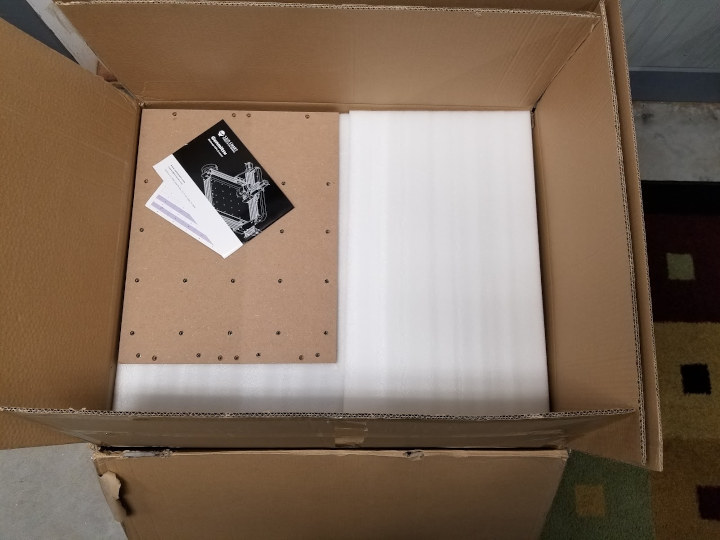
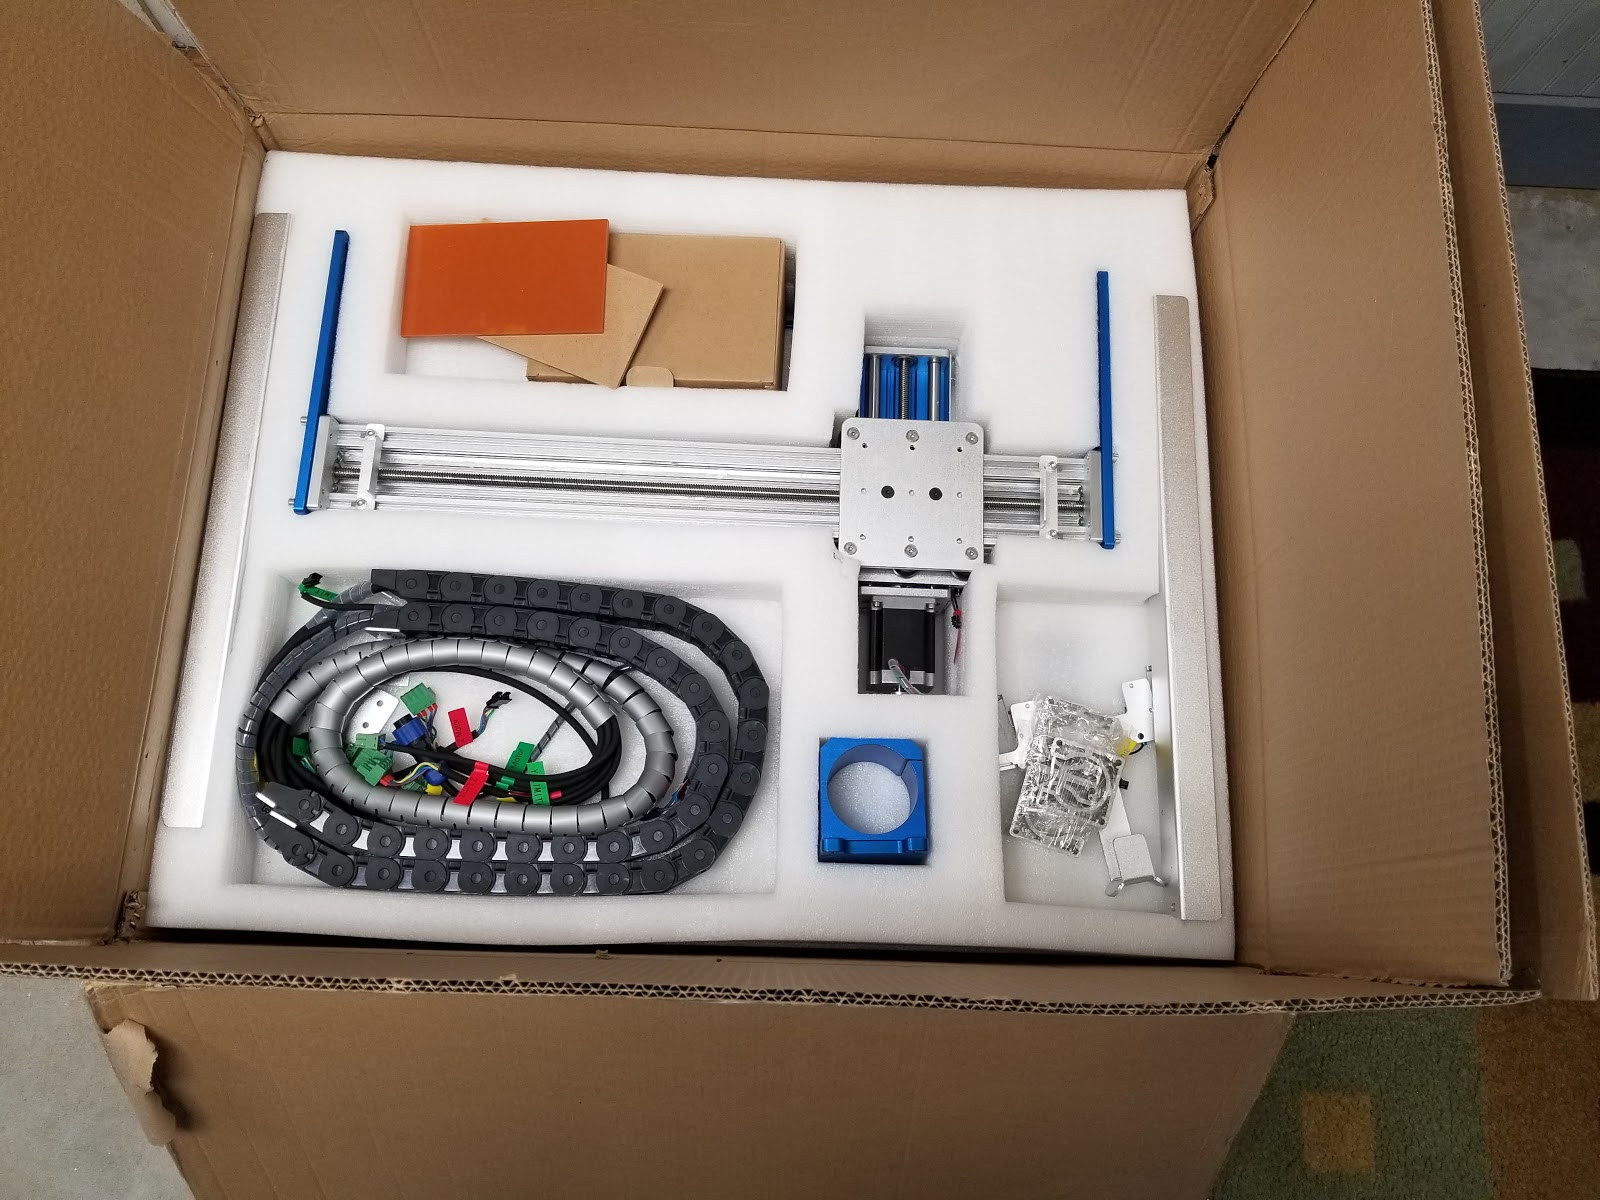
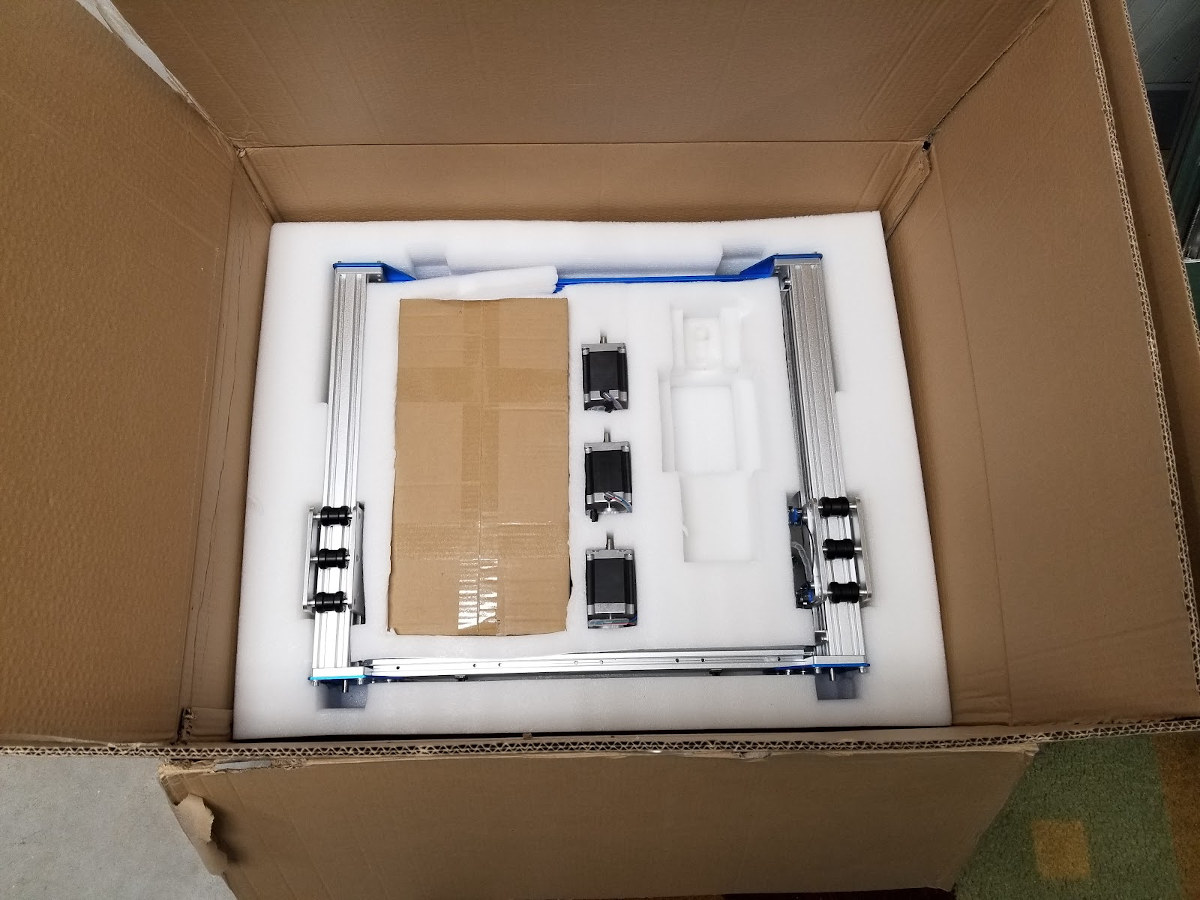
Genmitsu 4030 Unboxing and Assembly
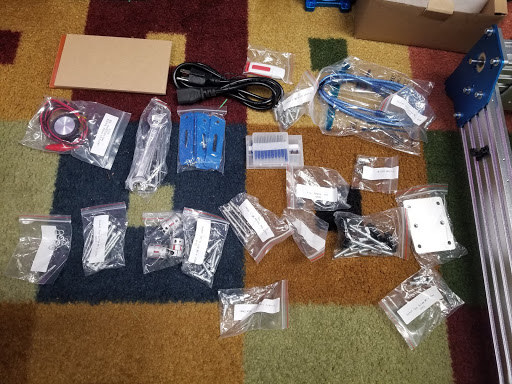
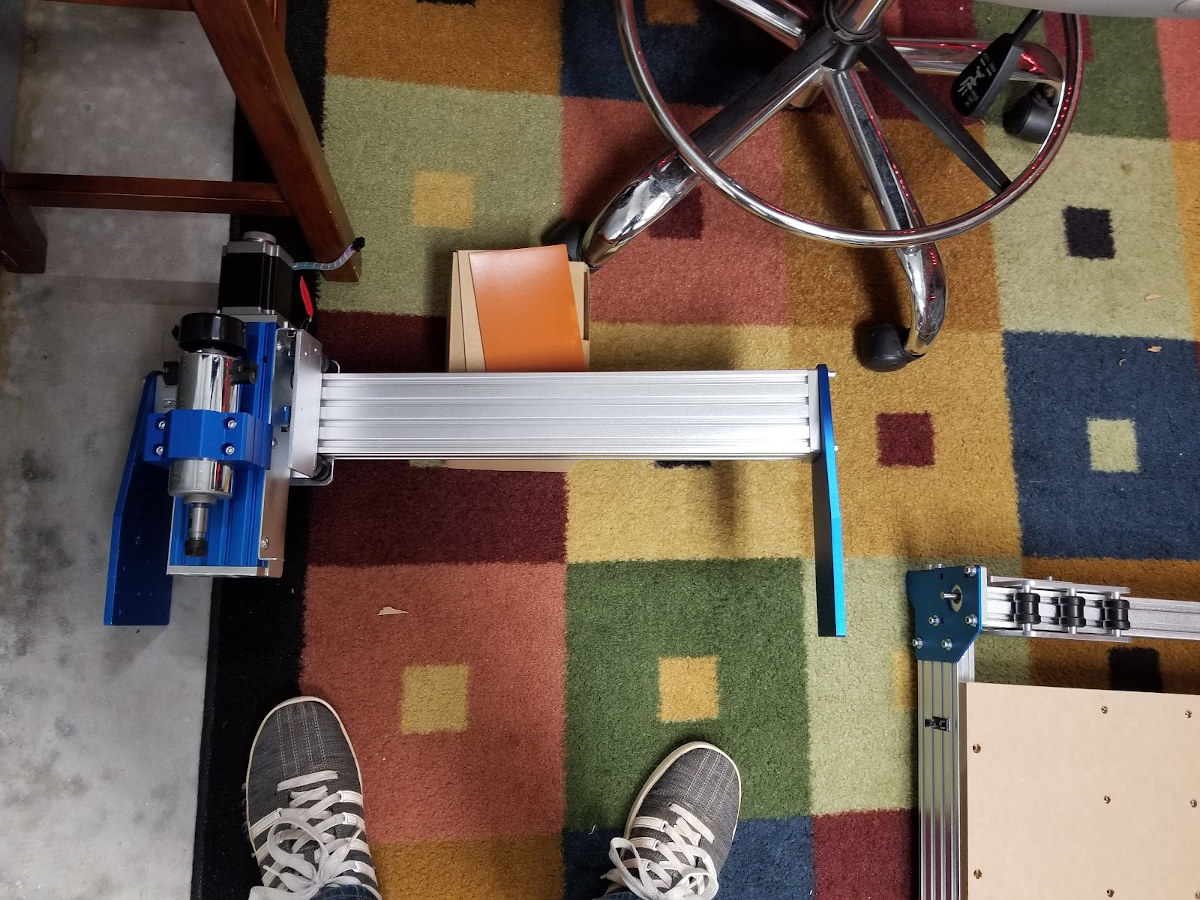
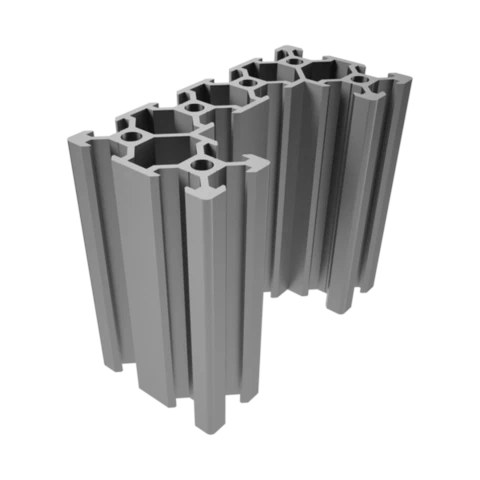
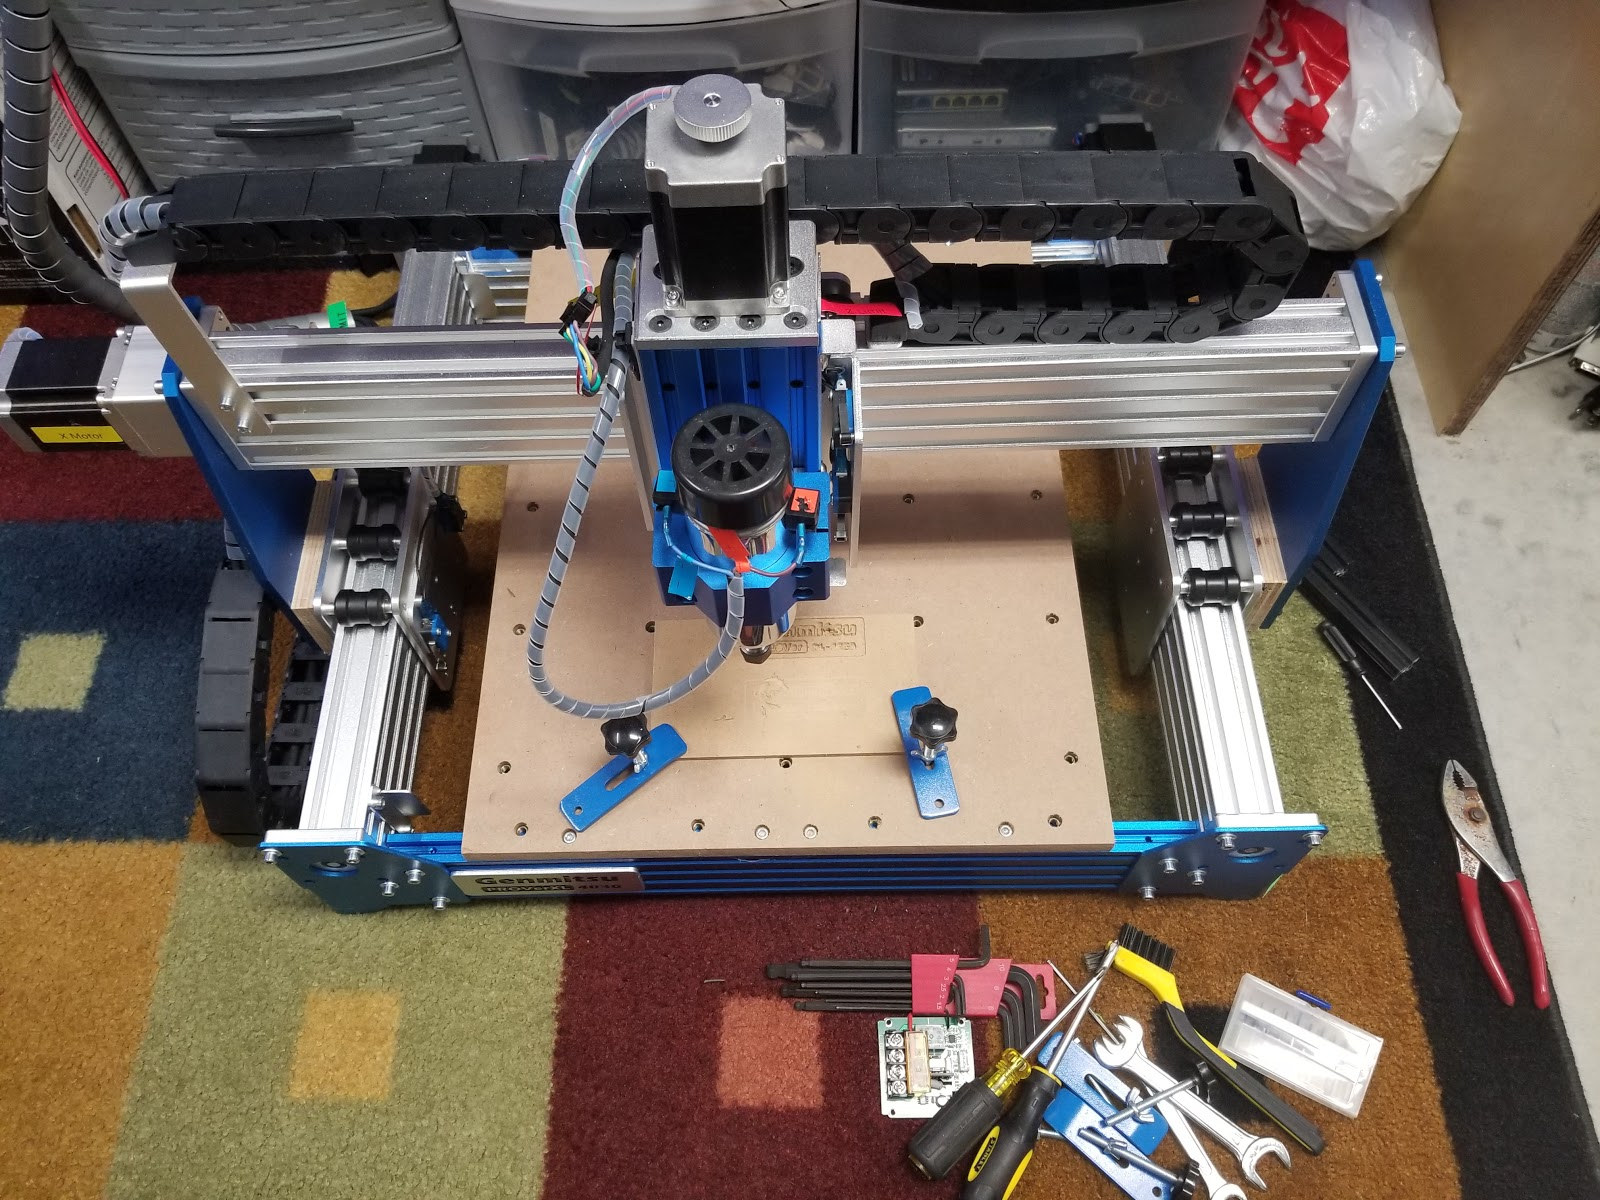
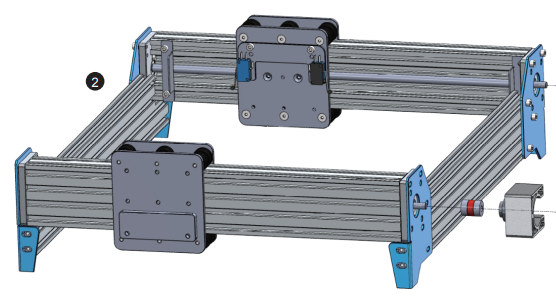
The main structural pieces of this machine are C beams. I had never seen this type of aluminum extrusion before (now I see it in the specs while writing this)….it took a while to figure out the name. During my research, I ran across some builds using these c beams and they always had the lead screws oriented on the outside of the machine. Below is a picture from the manual of the Genmistu 4030. Keep in mind that I had not received the Genmitsu 4030 yet. I compared pictures people shared and after a lot of deliberation, I realized that I should theoretically be able to flip these from the factory position in, to out, to protect the lead screws.
I really did not want to put it together and then take it apart again so I went ahead and tested the theory and I felt like it would not impact the review. I removed the 3 main bolts at each end and flipped the lead screws out. So far so good. I got really lucky because the inside plate and the outside plate are the exact same piece. I moved the limit switches back to the inside and the 2 aluminum plates back to the outside. So far so good. Everything was dandy, I couldn’t find any negatives so far and everything was going as planned.
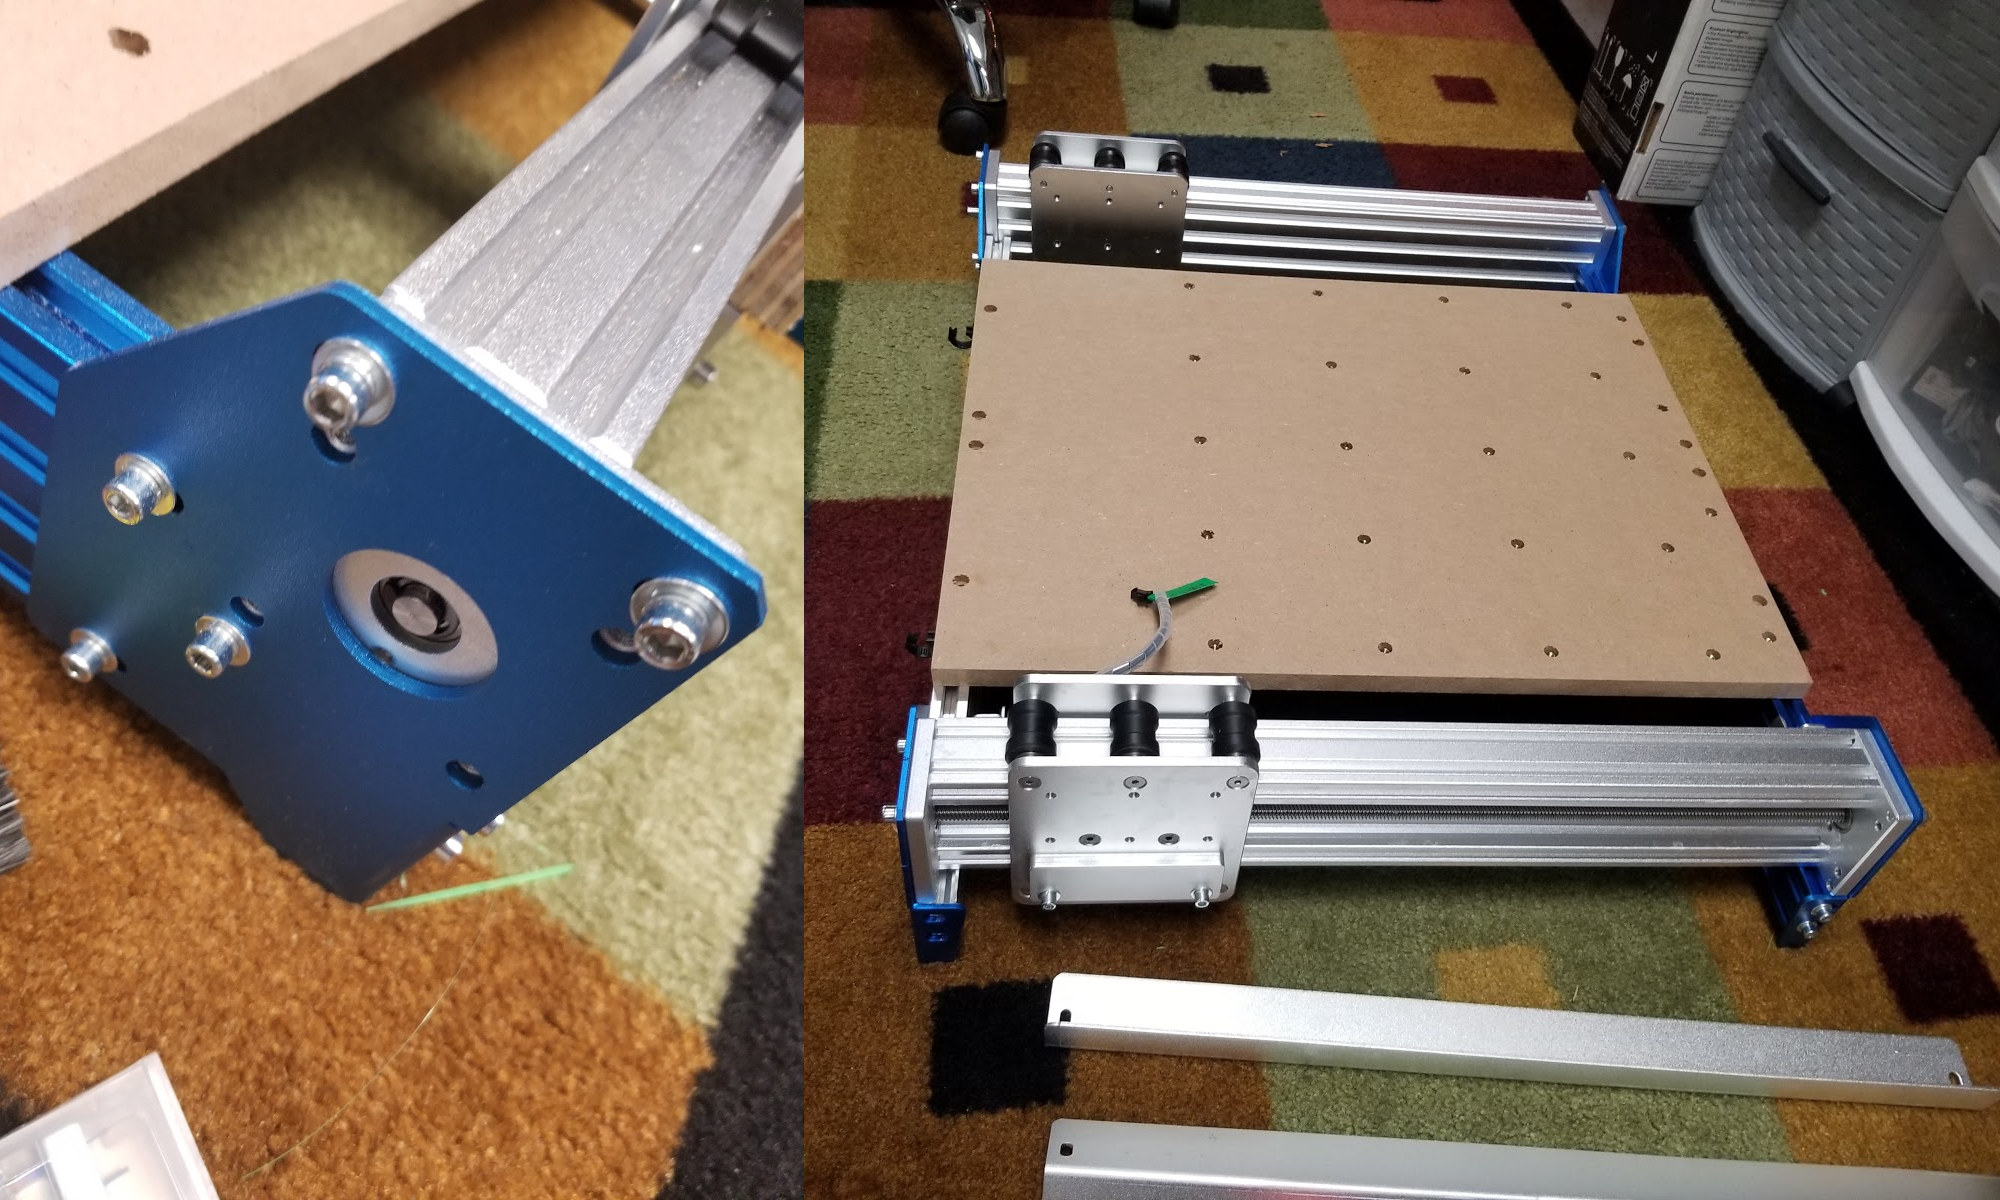
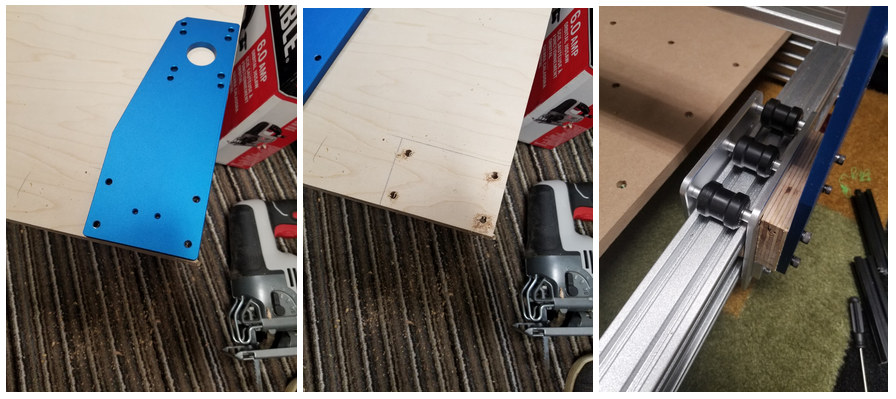
I did not want to physically alter the CNC in case something unforeseen stopped me from moving forward. This mod left a gap that needed to be filled because the C beams were closer together now. I measured and I needed to fill a 20mm gap on both sides. I first 3D printed a spacer but it turned out it was too tight, and I wasn’t convinced it would hold up. I finally realized that ¾ inch plywood is 19mm and it turned out to be the perfect solution. It literally took me 15 minutes to make both sides. I had the correct length bolts already. 1st mod done. I did have to very finely tune the endstops to ensure all the build volume is available. There is literally 1 mm of clearance now.
After this mod, I continued to follow the instructions which are very good. Instructions to set up the Z probe in the candle software are supplied. I have had really good success with Candle the supplied gcode sender so far.

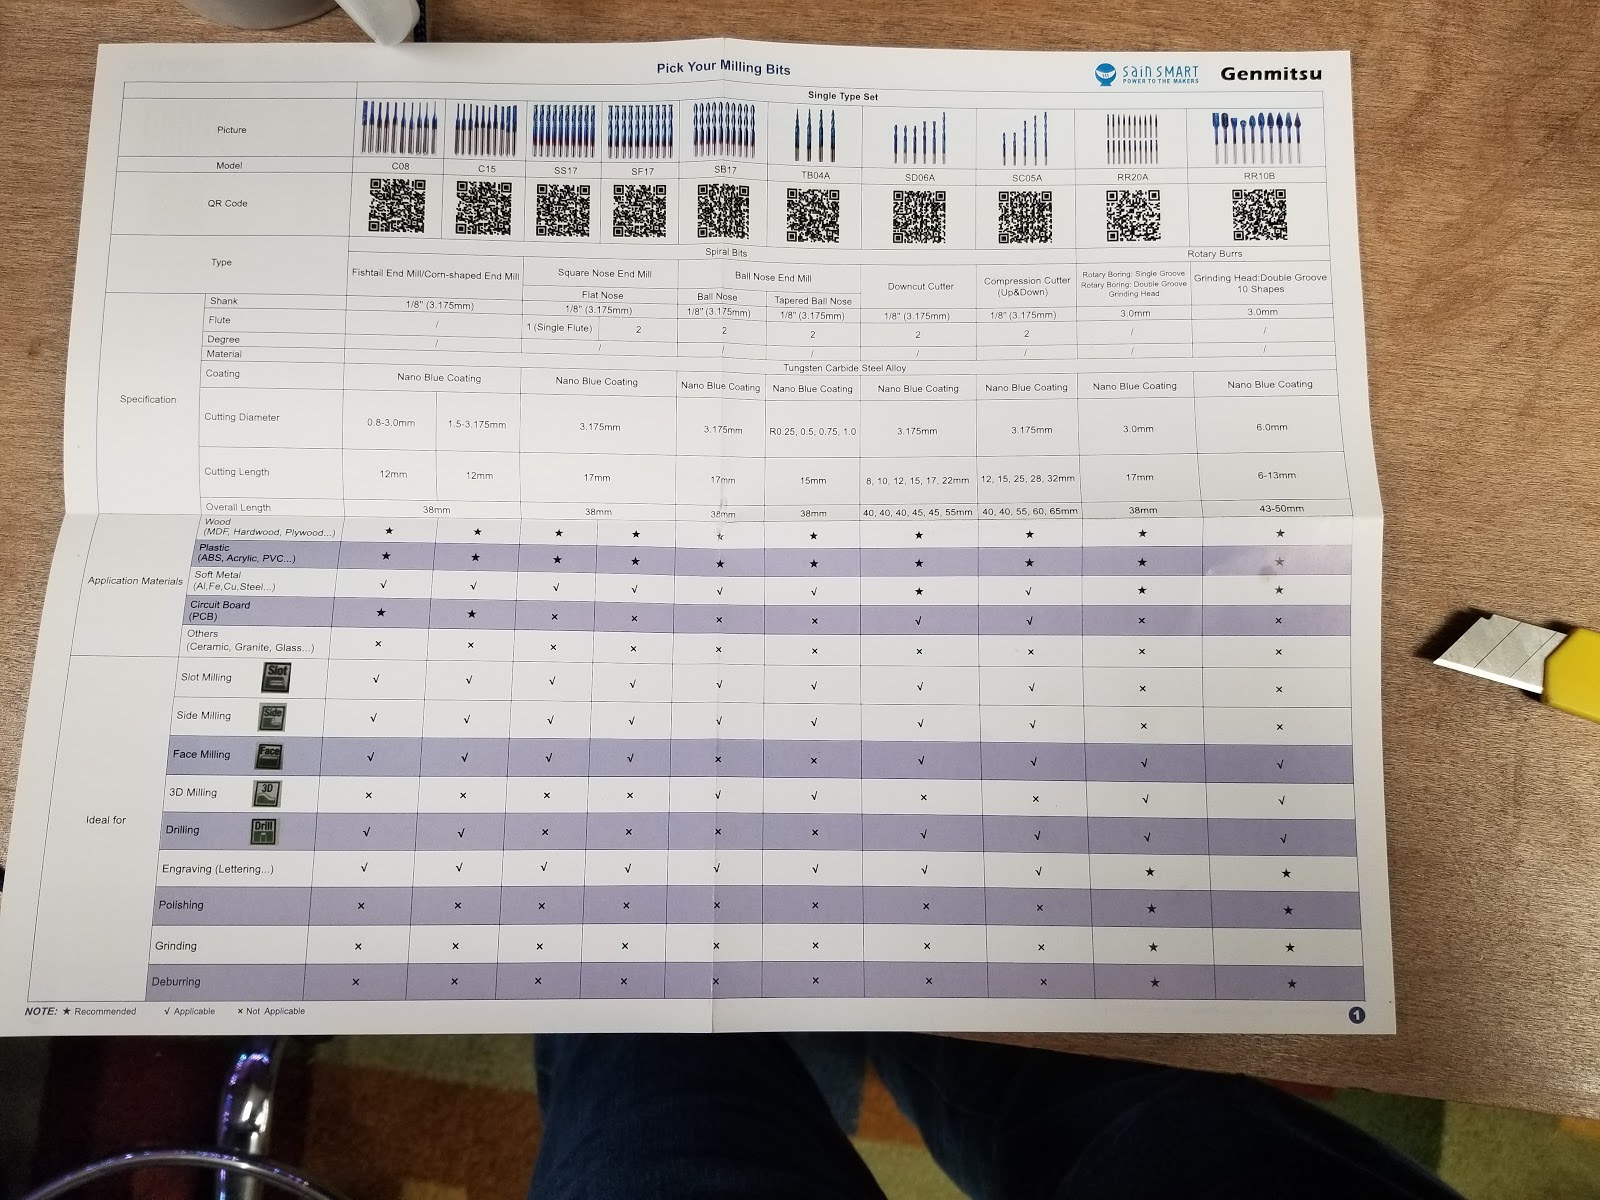
One other gem that is in the kit is a guide for bits. It’s not perfect but will give you a good idea of what bits should be used for the application or strategy you are milling.
Mod 2: RPM meter
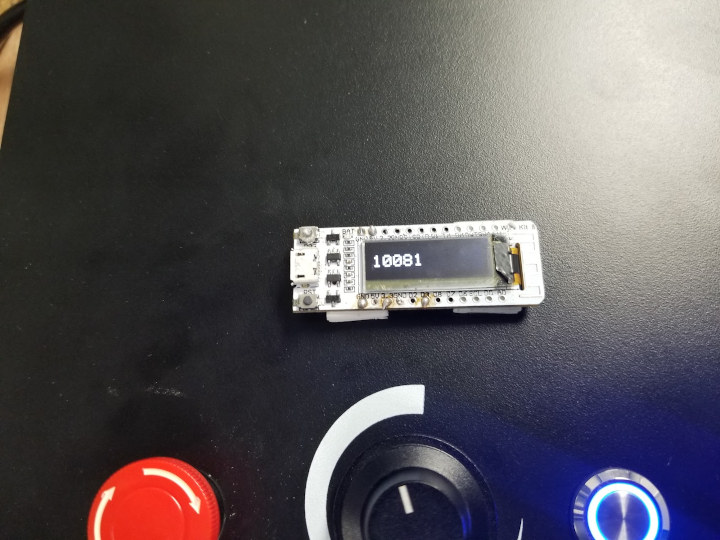
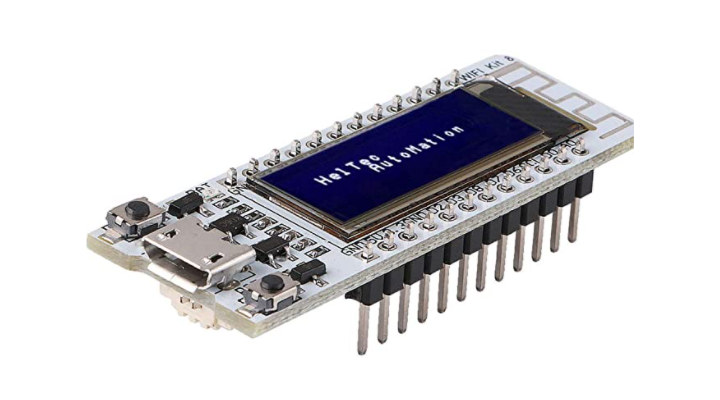
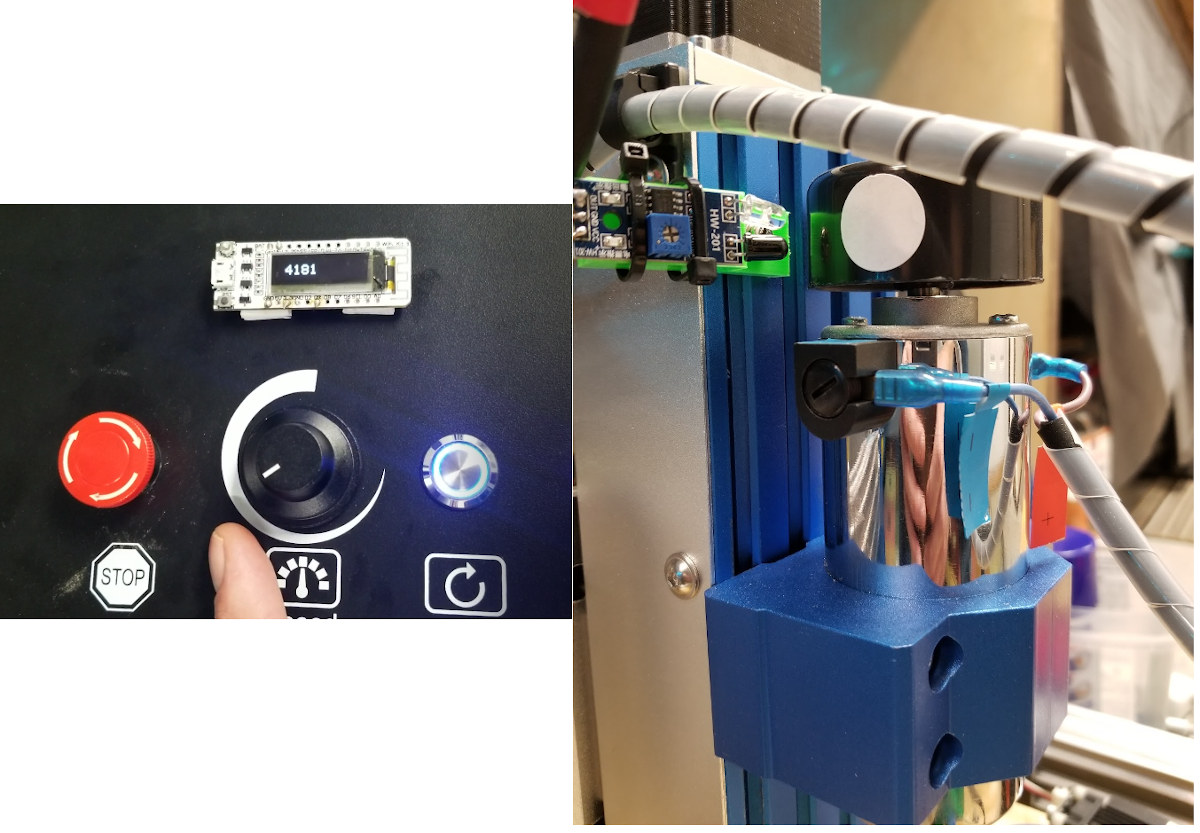
This took some time. I wanted to take a better approach to feeds and speeds and have repeatability. One aspect of that is knowing the spindle RPM. I saw a while ago on how to make an RPM meter and how inaccurate the cheap ones are. It all seemed simple and I purchased the hardware. I did go rogue and used untested hardware. My goal was to keep as simple and compact as possible. I found the Heltec ESP8266 with built-in OLED on Amazon. The price was right. Along with these IR avoidance sensors. Then use a power bank to power the handheld meter.
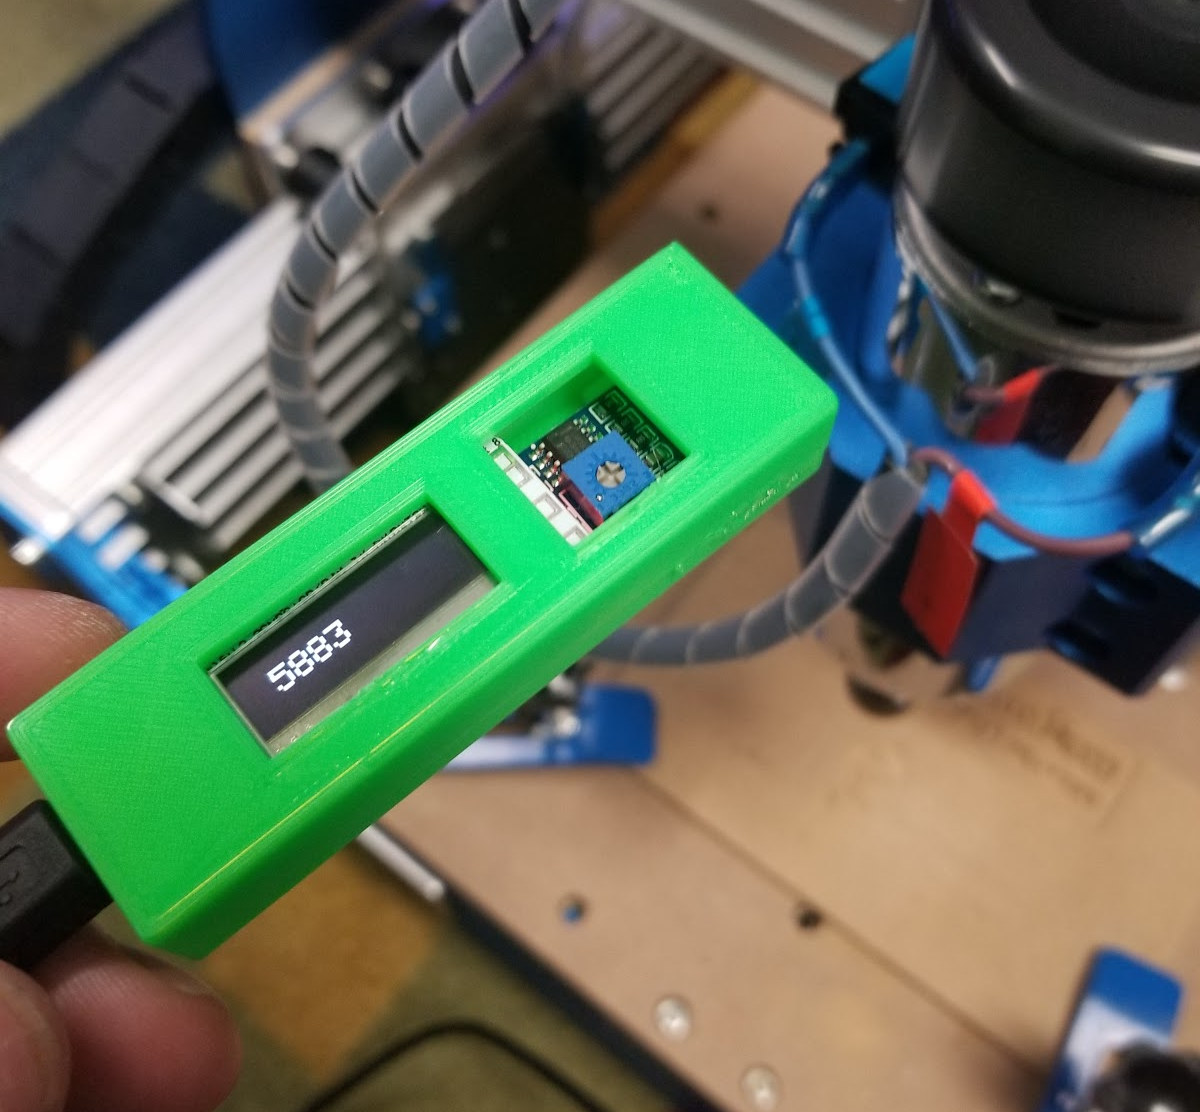
The software was challenging. I found a bunch of code examples but most were for ATmega devices. Some were just plain inaccurate. Luckily I found some good code. I forked and modified it for the hardware I was using here. Don’t judge. I am not a coder. I am surprised I was able to even get this to work. I was getting very strange results. It was working beautifully then get random readings. It took me quite a while to figure out that the code was limited to 4 characters. Once that was hashed out I ran some wire and permanently installed it. I used a buck converter from the power supply for 5V power. There are a lot of DIY RPM meters out there so I won’t go into much detail. I really like this mod and it seems very stable and accurate. I used D3 as the sensor pin and 3.3V for power.
Third Mod Dust collector for Genmitsu 4030
This should either come with the kit or be an accessory IMO.
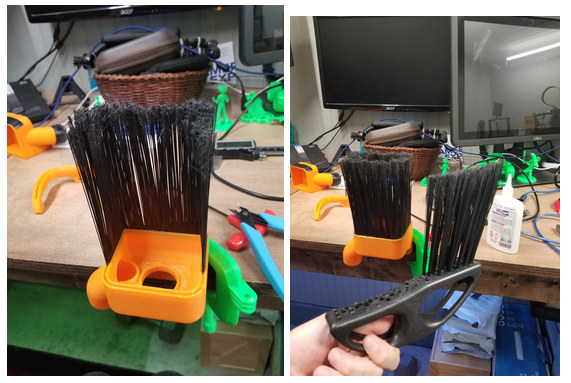
I purchased a broom for a couple of dollars but the bristles turned out to be too stiff. I did some minor mods to the original design and purchased some CNC specific brushes and it turned out ok. It is working right now but I will redesign it. It is just too weak. I ended up reinforcing with superglue and accelerant.
I am doing this review in my office and from my experience with the 3018 this was a requirement for me. The amount of dust generated just makes everything dirty. It is amazing how well it worked.
Finally Cutting something on Genmitsu 4030 CNC router
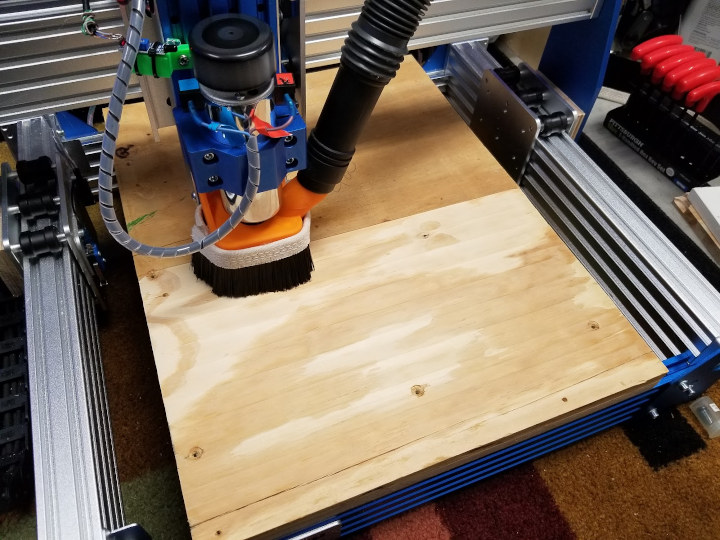
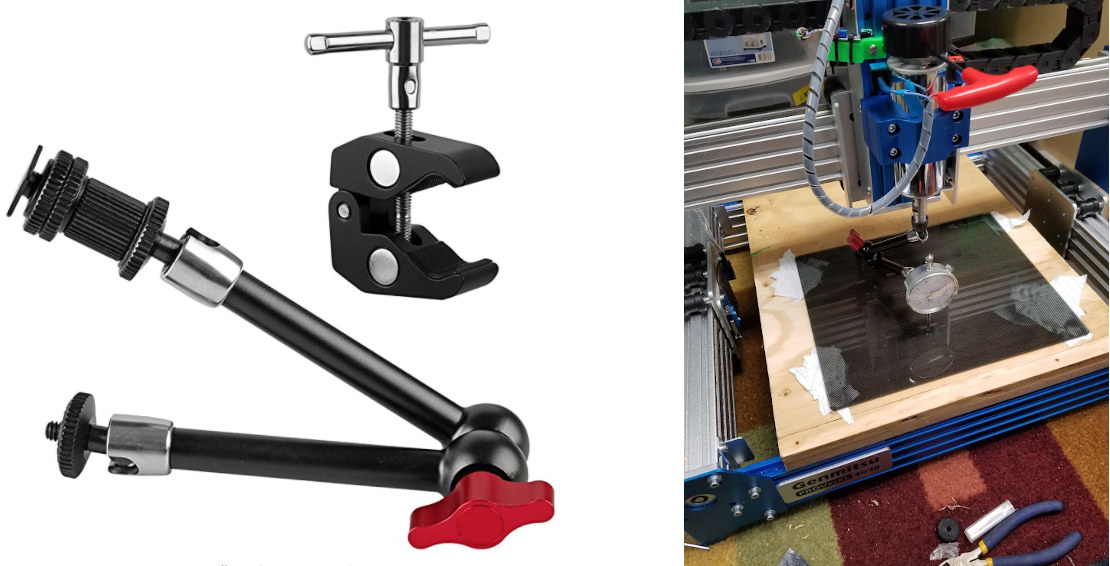
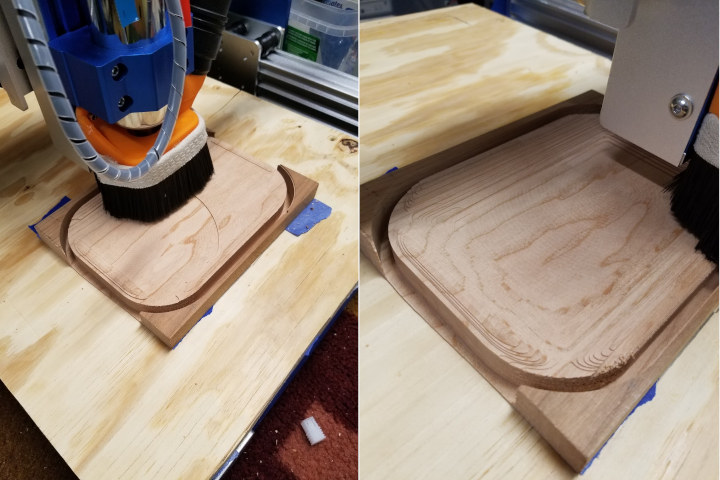
Finally, I was ready to start cutting but then I realized I was missing a step. Tramming the spindle. I needed to surface the spoil board to make sure it was completely level. I wanted to save the spoil board that came with the Genmitsu 4030 so I added an inexpensive piece of plywood I had to the top of the factory board. I got the first side done ready to flip and realized that there were ridges and the spoil board wasn’t completely flat. Argh…some more googling and I figured out the spindle needs to be trammed. Tramming the spindle is the process of making the spindle perfectly vertical to the spoil board. Luckily I had all the necessary tools. Dial indicator, piece of glass, and spindle arm. The arm I had on hand is really for holding cameras with ¼” x 20 thread. It is a little long for this operation but it ended up working fine. There are arms specifically made for this process available.
I was able to get the spindle within .03mm variance or .001 of an inch.
The basic process is as follows.
- Attach the dial indicator and arm in the spindle where the spindle can spin around without hitting anything
- Immobilize the spindle so it cannot spine and then move the spindle around to the 4 corners of the glass and use paper to level the glass starting with the highest corner
- Now that the glass is level, move the spindle to the center of the glass and move the spindle around and adjust the mount from left to right and front to back until the needle doesn’t move.
Seems easy but the first time it took me about 2 hours. Getting the spindle correct on the X-axis is easy. on the Y-axis not so much. Here is the second thing that I wish was different about the Genmitsu 4030. There is no official way to tram the Y-axis. I ended up using folded aluminum foil wedged between the mount and the spindle holder. This seems to be a common way to tram even on large machines but damn it is a pain.
I flipped my board around and reran the spoil board surfacing gcode and it came out perfect. I could see a pattern from the surfacing tool but running my fingers over the surface it felt perfectly smooth.
Holding the workpiece
The Genmitsu 4030 comes with a spoil board with holes in it that accepts machine screws with inserts installed. I had seen where using blue painter’s tape and super glue worked, and I concur it works really well, and you don’t have to worry about the spindle colliding with the bolts. What is done is place blue painters tape on the spoil board and the piece you are cutting and carving. Then put ca glue aka super glue on the spoil board side and activator on the workpiece side. The only difference now is that I don’t even use an activator anymore. It only takes a few seconds of pressing and the ca glue dries.
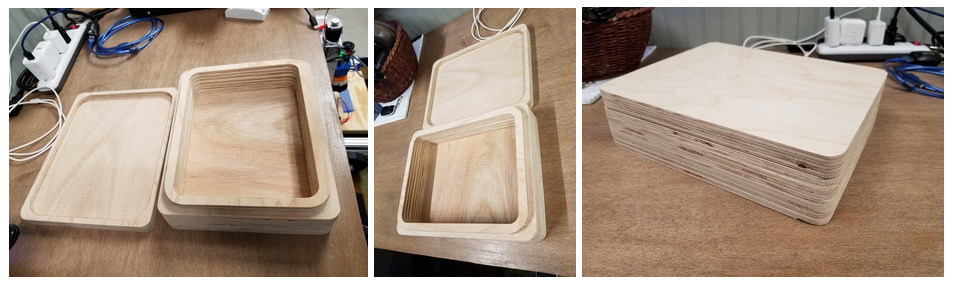
First project – Plywood box
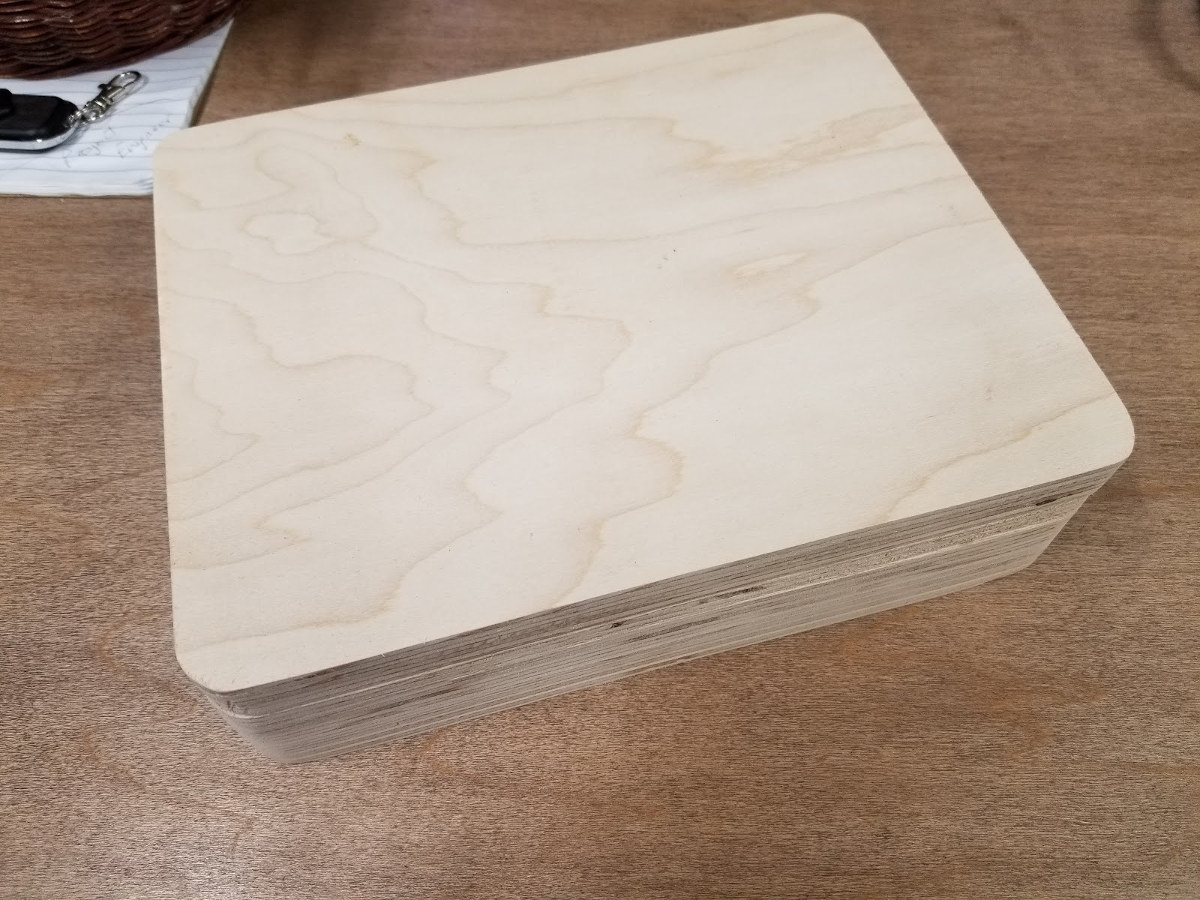
My first project was a simple plywood box. I am pretty happy with it. I designed it in Fusion 360 and used it to generate my gcode. I am pretty happy with it. I made a mistake somewhere. The lid wasn’t centered and was offset to one side. I have mostly fixed it with sanding. I am not sure if I messed up the model or when I was setting up cam. This was my first project and I was trying to test feeds and speeds on some scrap. I was getting a ton of chirping. I adjusted all the things. I did minimize it mostly but that was after a lot of time. I don’t want to call it wasted time because this is a learning process. Ultimately I was able to get clean cuts by using a different bit. I purchased some bits off of Amazon that I started using initially. After I exhausted adjusting feeds, speeds, and spindle speeds I swapped over to a ¼” downcut that Sainsmart sent and it was much better. Another lesson learned. Bits do matter quite a bit. I haven’t finished it yet. I am debating on putting an inlay in the top but want more practice.
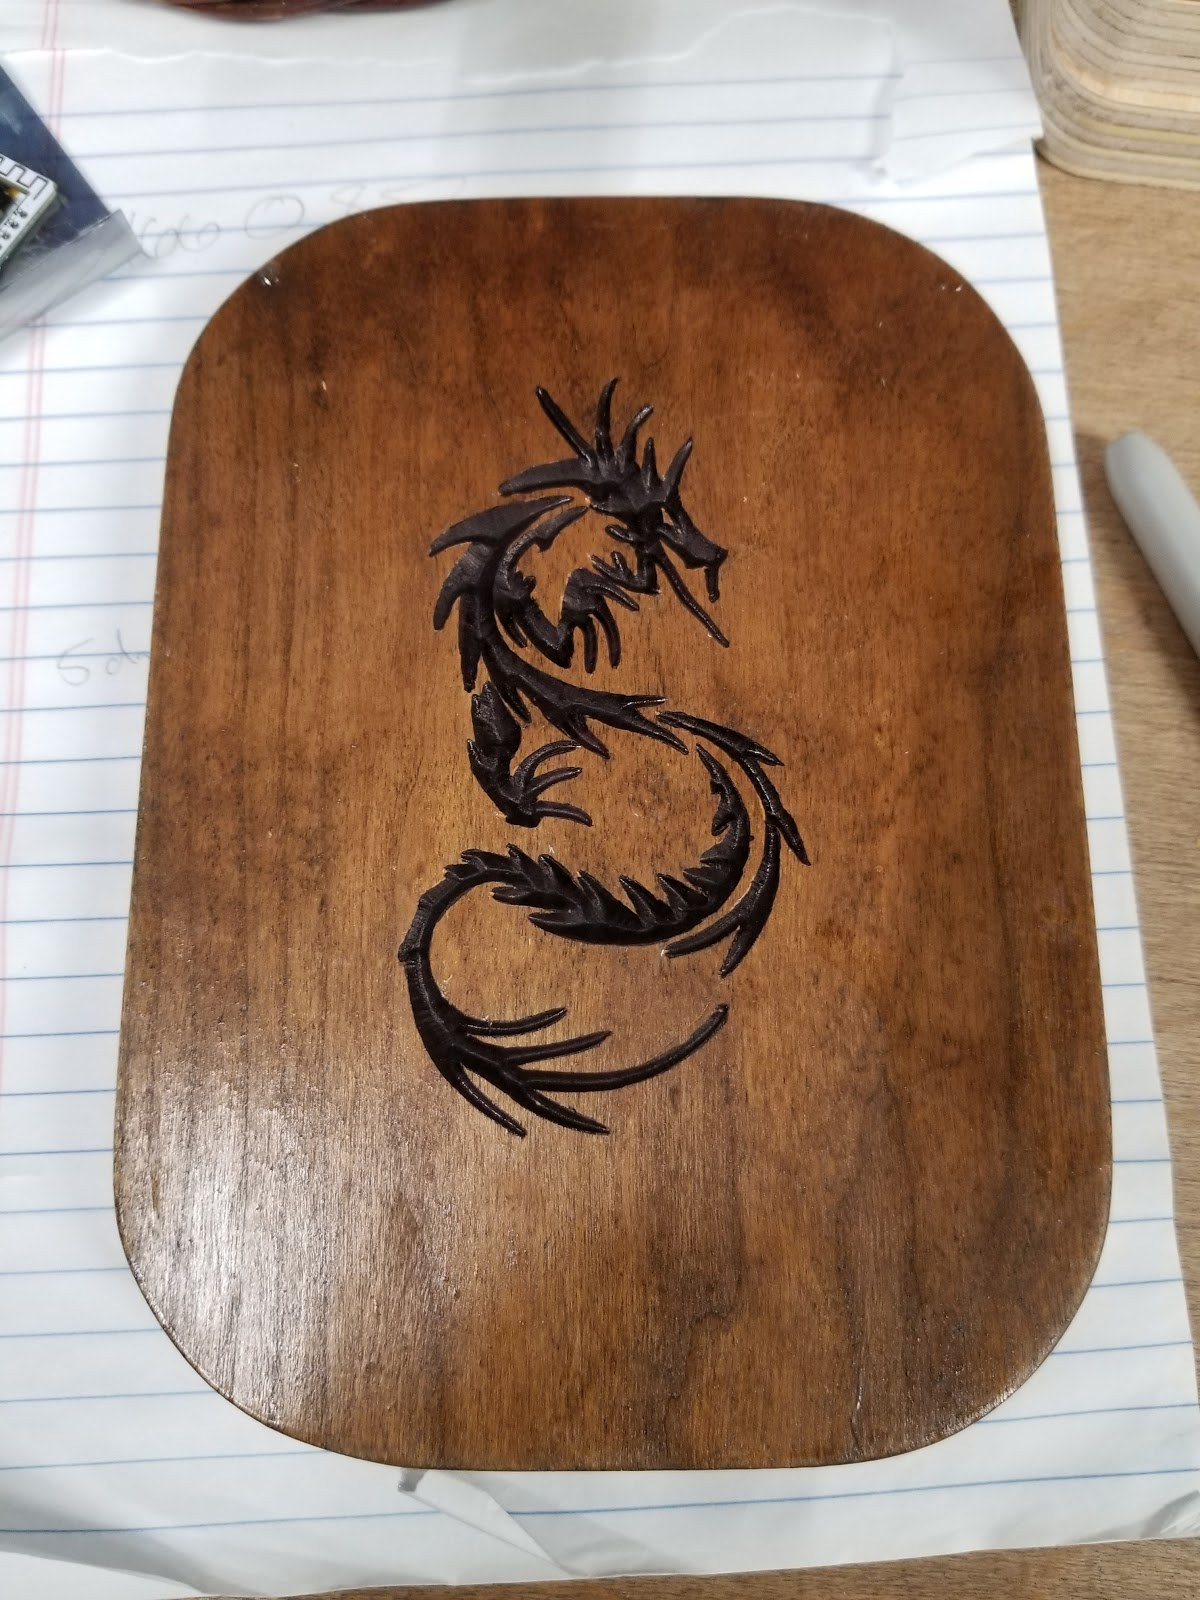
Second project – Dragon inlay
I am still working on simple projects right now. I made a buddy of mine a coin tray out of some cherry. I have had it for quite some time. I talked to the guy who built our cabinets into giving me some off cuts that he couldn’t use. Cherry is so nice. I really like the way this came out. I designed again in fusion 360 and used cam to generate the gcode. 1st 2 steps used the same ¼ downcut to trace the perimeter and rough out. I then followed up with a ball nose.
Another lesson learned. I should have done a smaller stepover. It took me forever to get all the ridges sanded out. I was afraid to use the power sander, gouging the wood, and messing up the curved surfaces. I sanded it all by hand. It was a little boring and after finishing I decided to do my first inlay.
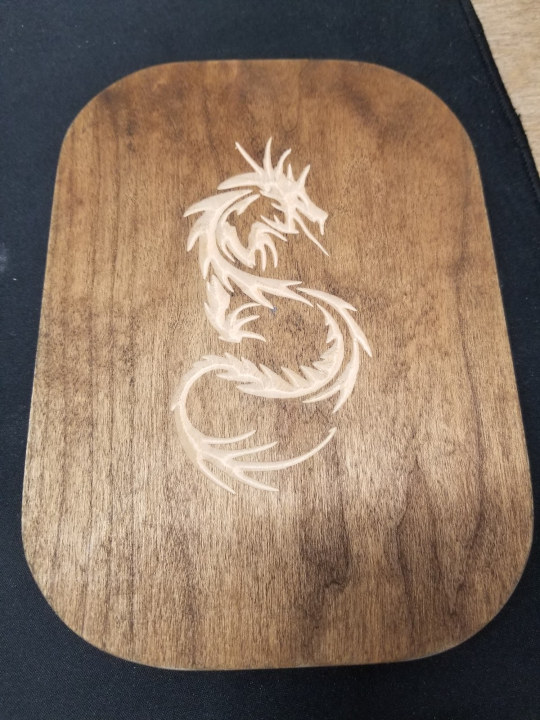
I took a chance and I thought it turned out great. But again a learning opportunity struck. I forgot to take a picture but after I put another coat of poly on it the dragon practically disappeared and my heart sank. The light area darkened and the dragon was pretty much invisible. Sharpie to the rescue. I really should have started over by sanding it all down but didn’t have enough time. I was still pretty happy.
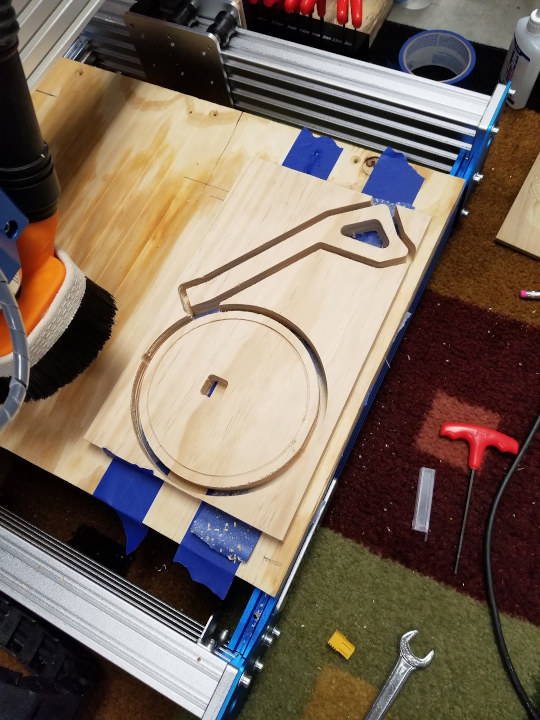
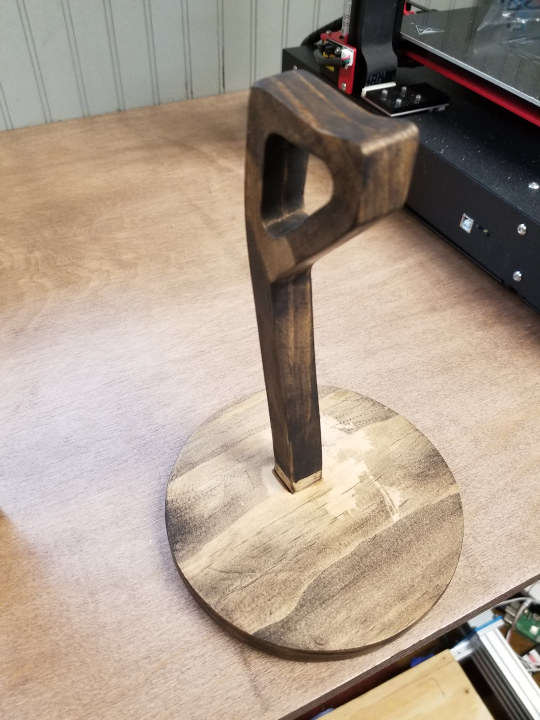
Third project – Headphone stand
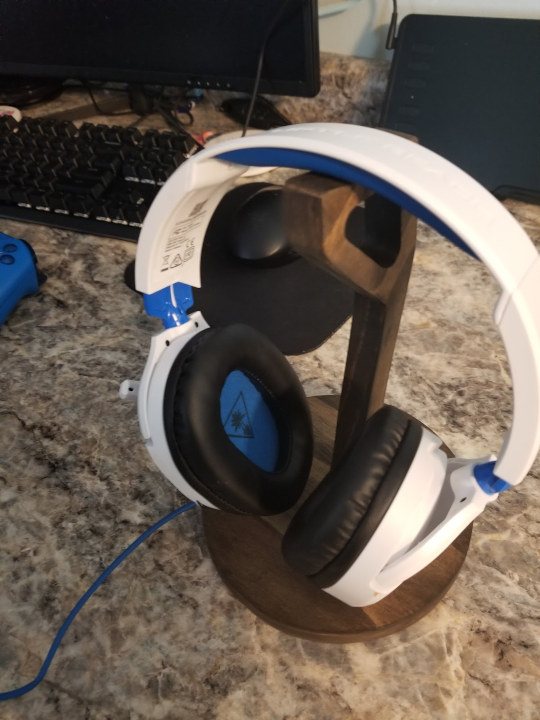
I finally got some time off from my day job over the holidays. It started off pretty slow. We usually go to the beach and stay at a place with indoor pools but things are different this year. We stayed home. Christmas was over and I had enough lounging around so I set off to make a headphone stand for my son. I designed, cut, and sanded all in one day. I was in no hurry. I was moving from project to project.
The next day was gluing and finishing. Then this happened.
Argh. I didn’t get enough of the glue off and the finish was blotchy. This time I had to start all over. No way I could live with myself. Luckily this was softer wood and power sanding made this not too bad of a mistake.
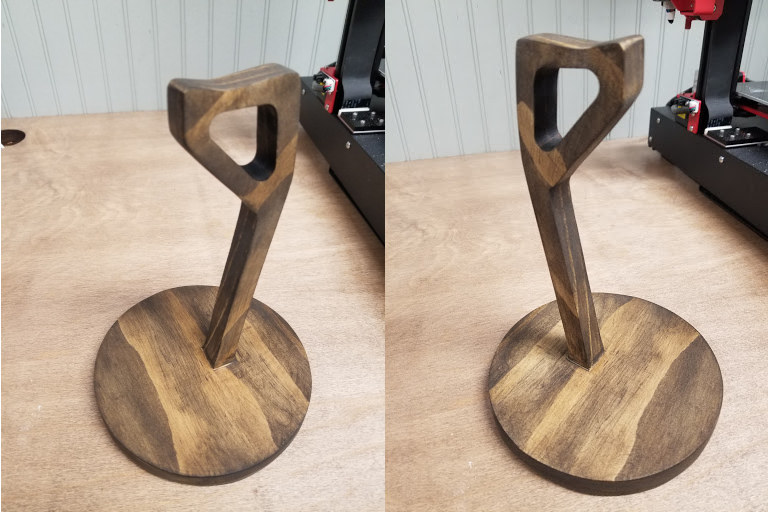
It’s not perfect. I was a little frustrated at the time and I should have taken more care of sanding….but overall again I was happy with the result.
Conclusion
This first impressions article is just that. This is not a full review. I will follow up later after I have had more experience with the Genmitsu 4030. I have mostly a positive experience so far. I do wish there was a first-party dust collector. That is my only real gripe right now. I have a nagging feeling the spindle is just not powerful enough. But I have no grounds to say that right now. It is telling that they provide a spindle holder for a Dewalt. People are also putting these 300w on the Genmitsu 3018 which is nowhere near the Genmitsu 4030. I am thinking about upgrading to an even larger spindle but I need to do some more research on it. As is the 300w works and it might be right-sized IDK. It might just be the bigger, better, faster, stronger mentality coming out but in reality, it might not be any different.
There are a few accessories that look interesting. An offline module for sending gcode. While getting the previous link they now have a vise that looks really nice but on the small side. Additionally, a kit to expand the size looks very nice.
Aluminum….I will test aluminum. I have a buddy that is a machinist and he has got me some nice scrap aluminum from work that he is donating to me. I have to go pick it up but the holidays really slowed things down.
I also want to try some inlays. Metal and wood. I found some ideas about inlaying copper wire that look promising. I did purchase some aluminum wire and tested it a little without success….I will work on my technique.
I would like to thank Sainsmart for sending over the Genmitsu 4030 for review. The CNC router can be purchased on Amazon for $999.

Karl is a technology enthusiast that contributes reviews of TV boxes, 3D printers, and other gadgets for makers.
Support CNX Software! Donate via cryptocurrencies, become a Patron on Patreon, or purchase goods on Amazon or Aliexpress


The grad students in the lab next door have to sit meticulously for hours/days with dental drills drilling out samples from rocks. I was hoping to be able to automate it with an affordable CNC machine (and an attached scanner bed) – but I seem to not be able to find any clear information about step sizes. Just looking at your dragon though, it seems you can achieve a crazy amount of detail. Could you recommend some resources for reading up on this? I also understand that hard material like stone are problematic (I think b/c it flexes the structure)… Read more »
Looks cool! I think that once you start CNCing wood, you can have way more fun than with just a laser cutter!
how creating gcode (CAM) from stl/obj file in linux? no using comercial program
https://grid.space/ has a free web based cam section. Also easel.
Where did you find the bracket that you mounted the sensor to the machine with, or did you design it yourself?
I designed it myself. After having the sensor now for a while I am not sure it is necessary. Just run wide open. You can check out my long term review. https://www.cnx-software.com/2021/05/10/genmitsu-proverxl-4030-cnc-router-review-mods-projects/
Thanks for the reply – would you be willing to share the STL for it? You’re right, with the stock spindle, it’s probably best to run wide open as it’s not quite pushing 11k, which from what I’ve read is a tad slow for wood. I haven’t had a single instance where I had clean edges. Not sure if that’s related to speed or what, as the bits are brand new, but I’m planning on upgrading either to the DWP611 or some other more powerful spindle, in which case the sensor would likely be more useful.